Did a deep clean turn your smooth analog stick into a stiff, crunchy mess? It happens to the best of us! Instead of smoother aiming, you’re fighting friction.
But don’t toss that gamepad just yet. Whether it’s trapped residue or a lubrication issue, I’ve got the fix. We’ll troubleshoot that stiffness and restore your precision in no time.
Ready to level up your hardware knowledge? Let’s get you back in the game with a controller that feels brand new!
TL;DR
- High-concentration isopropyl alcohol often strips essential factory lubricant from joystick modules.
- Lack of grease causes plastic components to grind, creating stiffness and eventual drift.
- Standard WD-40 and petroleum solvents can melt internal plastic gears and should be avoided.
- Re-lubricating with dielectric silicone grease is the only way to restore smooth movement.
Why Deep Cleaning Strips Factory Grease and Causes Friction
When you first unbox a new controller, the analog sticks feel buttery smooth. This isn’t magic; it is the result of industrial-grade lubricant applied at the factory.
Manufacturers use specific lithium or silicone-based greases inside the joystick module. This reduces friction between the moving plastic and metal components.
Many gamers rush to use high-concentration isopropyl alcohol (ISO) when fixing drift. While effective at cleaning, ISO is a potent solvent that dissolves grease.
If you flood the module with cleaner, you strip away that essential lubrication. Once the alcohol evaporates, it leaves the mechanism bone dry.
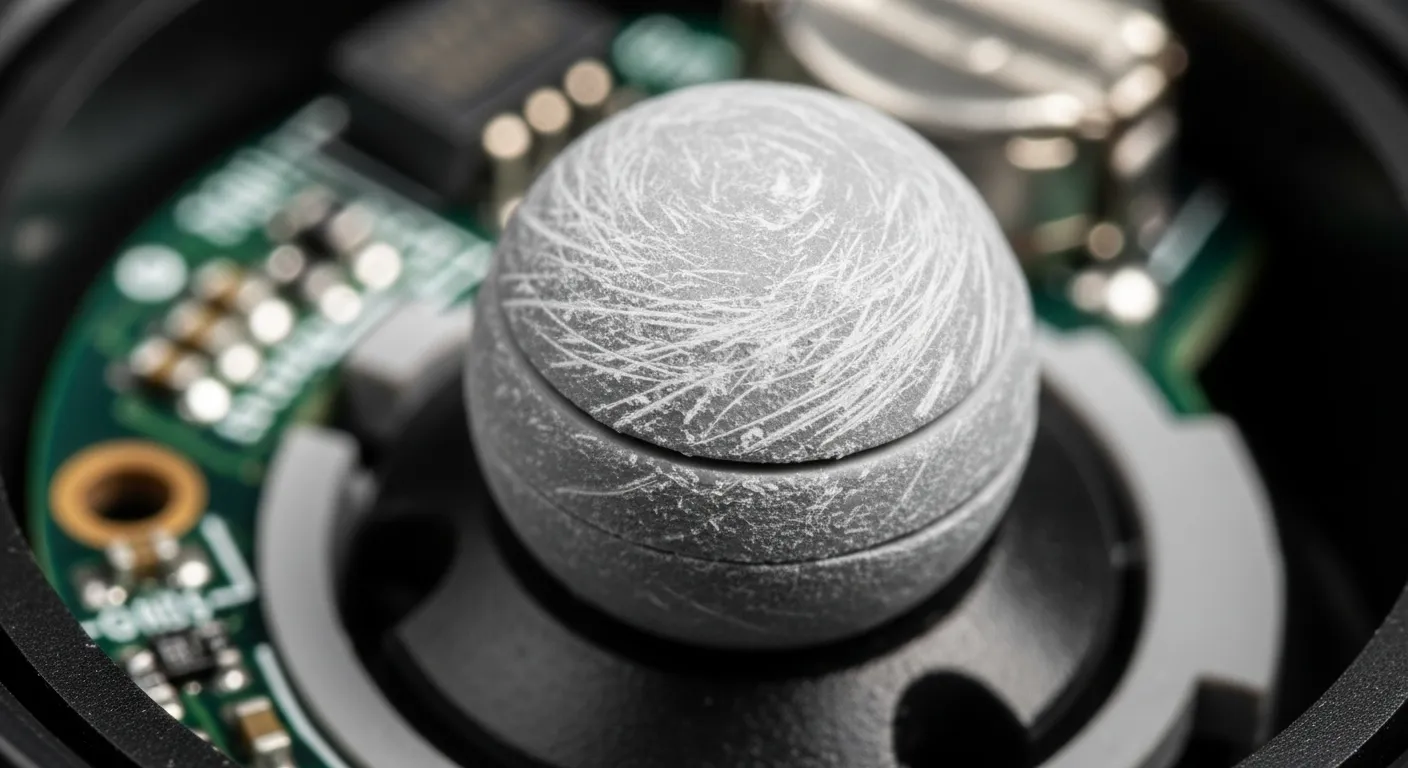
Without a buffer, plastic parts grind directly against each other. This creates the “stiffness” you feel and often results in a gritty, resistant sensation.
This friction doesn’t just feel bad; it accelerates wear. The grinding plastic creates fine dust, which settles on the sensors and causes drift all over again.
“Never use paint thinner, benzene, or alcohol. These may damage the surface of the controller or cause the parts to crack or fade.”– PlayStation Support, DualSense Wireless Controller Guide
Fast Facts
- Using high-concentration isopropyl alcohol to clean analog sticks strips away the essential factory grease, leaving the mechanism dry.
- The lack of lubrication causes increased friction, leading to a gritty feel and creating plastic dust that can cause drift to return.
- Manufacturers advise against using solvents like alcohol, as grinding parts accelerate wear and damage the controller’s internal components.
The Mechanics of Friction
Understanding the internal structure helps explain why this happens. Most traditional modules use potentiometer joysticks with physical wipers.
These wipers need a slick surface to glide over resistive tracks. When dry, they drag. This increases the force required to move the stick from the center.
You can actually visualize this resistance using the Gamepad Controller Test. A stiff stick often shows “jittery” movement rather than a smooth circle.
A bar chart showing controller issues, with Drift/Responsiveness leading at 40%, followed by Battery and Sticking Buttons at 15% each.
If your stick feels stiff, simply cleaning it again won’t help. In fact, more cleaning often makes the problem worse by removing any remaining residue.
To confirm if the stiffness is affecting your input accuracy, run a Circular Test. Watch for flat spots in the rotation where the friction prevents full travel.
If you are experiencing sticky face buttons alongside stiff sticks, the cause is often different. Check our guide on how to fix sticky controller buttons for specific tips.
Ultimately, stripping the factory grease turns a smooth mechanical system into a high-friction durability hazard. Re-lubrication is the only fix.
Fast Facts
- Cleaning traditional potentiometer joysticks often worsens performance by removing essential factory grease, leading to increased friction and stiffness.
- High friction results in mechanical drag that negatively impacts input accuracy, which can be visualized as jittery movement or flat spots in circular tests.
- Once the factory lubricant is stripped, re-lubrication is the only effective fix to restore smooth operation and prevent durability issues.
Guide to Re-Lubricating Analog Sticks Without Desoldering
Cleaning your controller with isopropyl alcohol is excellent for removing grime, but it often strips away the factory lubrication. This leaves plastic parts grinding directly against each other.
That friction is exactly what causes the “stiff” or “scratchy” feeling you are experiencing. To fix it, you must replace that grease without damaging the sensitive electronics inside.
Choosing the correct lubricant is the most critical step in this process. You must strictly avoid standard petroleum-based sprays or solvents, as they can chemically melt your hardware.
“Standard WD-40 is a solvent, not a lubricant… it will eat away at certain plastics and rubber.”– Whitson Gordon, How-To Geek
These harsh solvents can permanently ruin the internal mechanism of your gamepad. Instead, you should stick to safe, synthetic options designed for plastic gears and electronics.
| Lubricant Type | Safe for Plastic? | Recommended? |
|---|---|---|
| Silicone Grease (Dielectric) | ✅ Yes | ✅ Highly Recommended |
| Standard WD-40 | ❌ No (Melts Plastic) | ❌ Avoid Completely |
| Synthetic Multi-Purpose Grease | ✅ Yes (Check Label) | ✅ Good Alternative |
| Cooking Oil / Vaseline | ❌ No (Goes Rancid) | ❌ Do Not Use |
Once you have the right supply, you do not need to desolder the entire module. You can apply the lubricant externally with a little patience and a steady hand.
You will need a fine application tool for this task. A standard wooden toothpick or a very fine artist’s paintbrush works best for reaching the tight gaps around the sensor module.
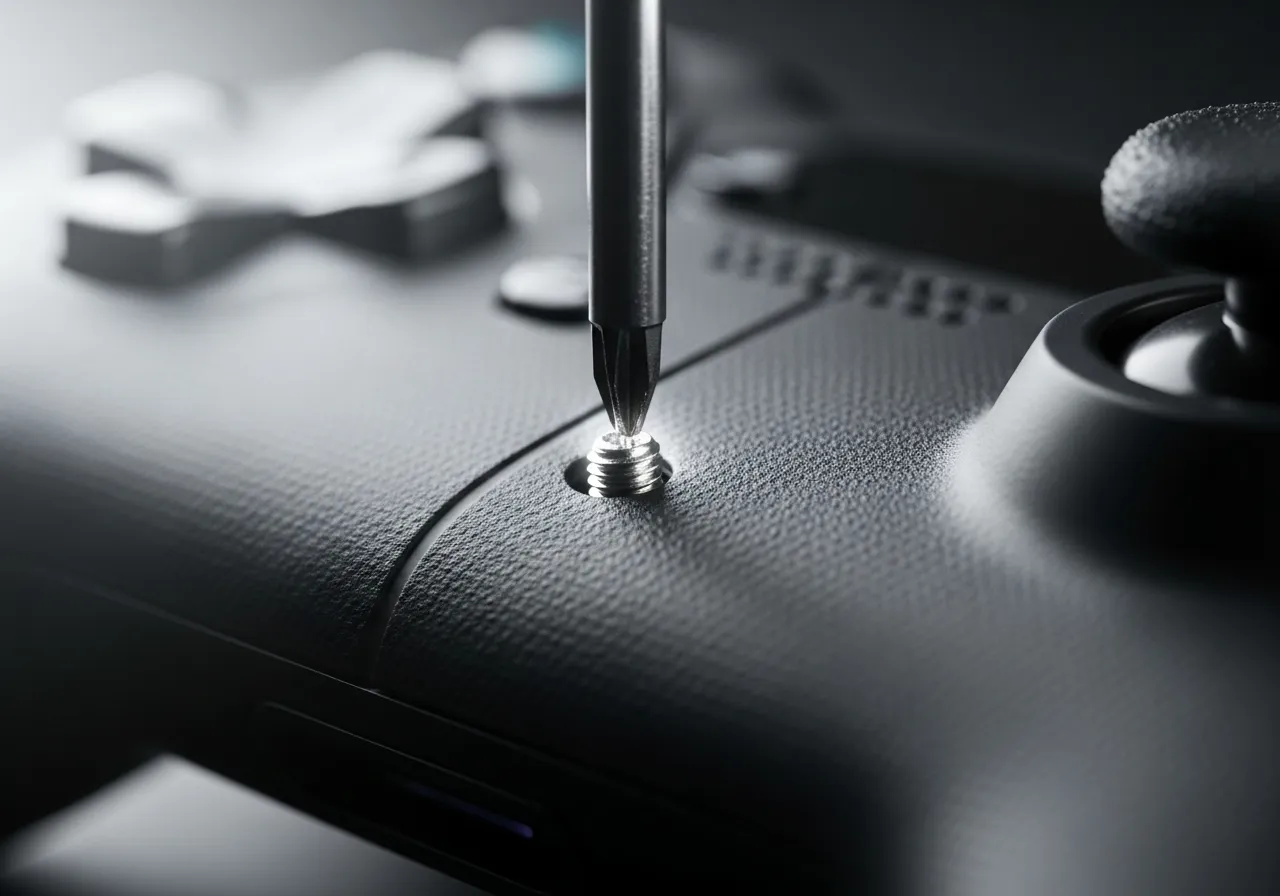
- Remove the faceplate if your controller design allows it easily. If not, gently lift the edge of the analog stick cap to reveal the rounded mechanism underneath.
- Squeeze a tiny drop of silicone grease onto a scrap piece of paper. You need an amount smaller than a grain of rice for the entire stick assembly.
- Dip the tip of your toothpick into the grease. Apply it gently to the rounded “ball” joint where the stick shaft meets the square module housing.
- Rotate the analog stick in a full 360-degree motion several times. This circular action helps distribute the lubricant evenly across all friction surfaces.
- If you can see the potentiometer wipers (the small wheels on the side), apply a microscopic amount there. Be careful not to bridge any electrical contacts.
After application, the stick might feel slightly heavier for a moment. Continue rotating it for a minute until the movement feels buttery smooth and the stiffness disappears.
If you find that your potentiometers require constant maintenance to stay smooth, you might want to learn about Hall Effect vs potentiometer joysticks for your next upgrade.
Finally, ensure you haven’t introduced any new issues during the process. Connect your controller and run a Gamepad Drift Test to confirm the stick centers perfectly.
Choosing the Correct Plastic-Safe Lubricants
If your analog stick feels rigid or “crunchy” after a deep clean, you likely removed the factory lubrication. This is a common issue for gamers.
To restore that smooth glide, you must apply a new layer of lubricant. However, choosing the wrong type can chemically melt your controller’s internals.
The Golden Rule: Plastic-Safe Only
The internal mechanism of a joystick housing is made of plastic, usually ABS or similar polymers. You need a lubricant explicitly labeled “plastic-safe.”
“Plastic compatibility is critical. Petroleum-based products can cause stress cracking or softening of the plastic components over time.”– Engineering Team, Nye Lubricants Technical Guide
Using the wrong chemical can turn a stiff stick into a broken one. Avoid petroleum-based oils, as they eventually degrade the plastic housing.
Top Recommendations for Controllers
We recommend two specific types of lubrication for analog modules. Both are widely available and safe for electronics.
- Silicone Grease (Dielectric Grease): This is the industry standard. It is thick, stays in place, and does not damage plastic.
- Dry PTFE Spray: A dry lubricant that leaves a slippery film. It attracts less dust than grease but may wear off faster.
- White Lithium Grease: Generally safe for plastic-on-plastic friction, but ensure the label specifically states it is plastic-safe.
For most users, a tiny amount of silicone grease is the best long-term solution. It mimics the damping feel of a brand-new controller.
A bar chart showing Silicone Grease and Dry PTFE have the highest safety ratings for ABS plastic, while Standard WD-40 poses a high risk of damage.
What to Avoid at All Costs
Never spray standard WD-40 (the blue and yellow can) directly into your analog stick. It is a solvent, not a lubricant, and will ruin the mechanism.
Additionally, avoid using cooking oils, machine oil, or petroleum jelly (Vaseline). These substances attract dust and create a sludge inside the module.
This sludge build-up often leads to other issues. If you use the wrong lube, you might end up needing to learn how to fix sticky controller buttons without taking it apart later.
Application Strategy
When applying your chosen lubricant, remember that a little goes a long way. You want to reduce friction, not clog the sensor wheels.
Use a toothpick or a fine precision applicator to place a pinhead-sized amount of grease on the moving ball joint of the analog stick.
Once applied, rotate the stick in circles for thirty seconds. This distributes the grease evenly across the contact points.
If you suspect your controller has other hardware faults beyond stiffness, running a Gamepad Drift Test can help isolate the issue before you apply any grease.
Precision Application Techniques for Stick Modules
When fixing a stiff analog stick, the amount of solution you use is just as critical as the type of solution. Flooding the module is a common mistake.
Excess fluid mixes with dust to form a paste, which eventually dries and causes the exact resistance you are trying to eliminate.
To avoid this, specific application methods are required. You need to target the internal potentiometers without soaking the plastic housing.
“Use the extension straw to pinpoint the application. Use short bursts… to prevent over-spray and waste.”– Tech Support, CAIG Laboratories Application Guide
Here are the best tools for precise maintenance to ensure your controller stays responsive:
- Precision Straws: Most contact cleaners come with these. They are essential for directing spray into the small gap next to the sensor wheel.
- Toothpicks: Dip a toothpick into your lubricant. Use the tip to apply a single drop exactly where the plastic friction ring meets the stick.
- Syringes: For advanced users, a blunt-tip syringe offers the ultimate control for depositing high-viscosity damping grease.
Once you have your tools ready, follow this method for the best results. This technique prevents the “sludge” effect inside the mechanism.
- Isolate the Sensor: Tilt the analog stick to the side to expose the gap leading to the internal sensor wheels.
- Apply Minimally: If spraying, use a quick half-second burst. If using a toothpick, touch the lubrication point gently.
- Distribute Immediately: Rotate the stick in full 360-degree circles for thirty seconds. This spreads the fluid evenly before it dries.
After application, it is time to verify your repair. You want to ensure the stick returns to center instantly without dragging or drifting.
Head over to the Gamepad Controller Test to visualize your analog stick’s movement in real-time.
Watch the circularity and deadzone readings. If the movement feels sluggish on screen, you may need to let the solvent evaporate for longer.
Fast Facts
- Stiffness or friction in analog sticks is often caused by stripped factory lubrication, which can be restored without desoldering the module.
- It is critical to use plastic-safe lubricants like silicone dielectric grease and strictly avoid petroleum-based solvents like standard WD-40, which can melt internal components.
- To apply, use a fine tool like a toothpick to place a tiny amount of grease on the ball joint mechanism, then rotate the stick 360 degrees to distribute it evenly.
Troubleshooting Stiffness: Shell Tension and Debris Checks
Sometimes the simplest answer is the right one. If you disassembled your gamepad to clean it, you might have been too enthusiastic during reassembly.
Overtightening the screws on the controller shell is a very common mistake. It squeezes the plastic housing directly against the thumbstick module.
This compression creates unnecessary physical friction. The stick rubs against the shell edge, making it feel stiff or slow to return to center.
To fix this, grab your screwdriver. Loosen the screws nearest to the affected analog stick by just a quarter turn. It relieves pressure instantly.
This principle applies to many hardware tweaks. We discuss shell tension in our Xbox Series X|S D-Pad repair guide as well.
If you did not open the controller, the stiffness might be caused by “sludge displacement.” This happens when cleaning fluid moves dirt around.
When you spray cleaner externally, it can wash surface grime down the shaft. This mixture settles into the mechanism and dries into a sticky paste.
You need to break up this new blockage. Apply a small amount of high-percentage isopropyl alcohol and rotate the stick vigorously.
Understanding how joystick controllers work helps you visualize where this gunk gets trapped. It usually sits right in the pivot point.
“Check that the analog sticks are clean. If the analog sticks are sticky or have a substance on them, wipe them down with a soft, dry cloth.”– Nintendo Support, Joy-Con Control Stick Troubleshooting
Here is a quick checklist to diagnose if your stiffness is caused by debris or tension. Run through these steps before attempting a full teardown.
- Auditory Check: Listen closely while moving the stick. A scratching sound usually indicates trapped debris like sand or crumbs.
- Seam Inspection: Look at the seam line of the controller. If it looks uneven or pinched, the screws are likely too tight.
- Click Test: Press the L3/R3 button. If it feels mushy or does not click crisp, the shell is likely compressing the module.
- Visual Gap: Ensure there is a tiny, uniform gap between the stick cap and the cosmetic ring around it.
If these tension adjustments and debris clear-outs do not restore the smooth glide, the lubricant inside the potentiometer may have dried out.
Fast Facts
- Overtightening the controller shell screws is a common cause of stick stiffness, creating friction against the thumbstick module that can be fixed by loosening the screws near the affected stick by a quarter turn.
- External cleaning can lead to “sludge displacement,” where grime is washed down the shaft and dries into a sticky paste, requiring high-percentage isopropyl alcohol and vigorous rotation to break up.
- Before a full teardown, use diagnostic checks like listening for scratching sounds (indicating debris) or testing for mushy L3/R3 clicks (indicating shell tension) to identify the root cause.
Get That Buttery Smooth Feel Back
Don’t panic if your sticks feel gritty. You just did too good a job cleaning!
You stripped the factory lube, but it is an easy fix. A tiny drop of silicone oil is all you need.
Apply the grease, rotate the stick, and feel the glide return instantly.
Level up your controller knowledge and enjoy precise aiming again. Let’s get you back in the game!
Frequently Asked Questions
Can I use standard WD-40 to lube my analog stick?
Absolutely not! Standard WD-40 can melt plastic internals. Only use Specialist Silicone WD-40 or dielectric grease.
Will the stiffness go away over time without lube?
No, it usually gets worse. Using it dry grinds the plastic, creating dust that causes drift. Fix it now.
Did I break my controller by cleaning it with alcohol?
Unlikely! You just dried out the mechanism. Re-lubricating the module restores the smooth feel immediately.
How much lubricant should I apply?
Less is more. A pinhead-sized amount is enough. Too much attracts dust and causes gunk buildup.
Technical Glossary
- Analog Sticks
- Controller input components that rely on factory-applied industrial-grade lubricant for smooth mechanical movement.
- Isopropyl Alcohol (ISO)
- A potent solvent effective at cleaning but capable of stripping essential grease from joystick modules, causing friction.
- Potentiometer Joysticks
- Traditional joystick modules that use physical wipers to measure position and movement.
- Resistive Tracks
- Internal components within a joystick module that wipers glide over; they require a slick surface to prevent drag.
- Drift
- A controller issue where sensors register movement without physical input, often exacerbated by dust from grinding plastic parts.


