Is controller snapback messing up your aim?
That frustrating, tiny input after you release a stick can ruin a perfect play.
But don’t sweat it; we’ve got your back!
This guide provides simple, effective fixes for your PS5 and Xbox controllers.
We’ll help you diagnose and eliminate snapback so you can get back to crisp, accurate inputs.
Let’s get you back in the game, fast!
TL;DR
- Controller snapback is a momentary, opposite-direction input after releasing a joystick, caused by an overly forceful spring mechanism, and it is different from stick drift.
- The easiest initial fix is a software adjustment: increasing your controller’s deadzone in console or game settings to ignore the slight overshoot.
- While software fixes often work, snapback is a mechanical issue that may stem from design or wear, sometimes requiring hardware-level solutions for a permanent fix.
Understanding Controller Snapback (And Why It’s Not Stick Drift)
Ever lined up the perfect shot, released the analog stick, and watched your aim jerk in the opposite direction? That frustrating little twitch is controller snapback. It’s a common hardware issue, but it’s often mistaken for its notorious cousin, stick drift.
Let’s clear things up.
Snapback happens when you let go of a joystick, and the spring mechanism returns it to the center with too much force.
This momentum makes it overshoot the neutral position, registering a brief, unwanted input on the opposite axis.
Snapback vs. Stick Drift: What’s the Difference?
While both cause unwanted character movement, their behavior is distinct. Stick drift is a constant, phantom input, even when you aren’t touching the joystick. Snapback is a momentary reaction that only occurs right after releasing the stick.
If you’re unsure which problem you have, our tools can help.
Head over to the Gamepad Drift Test to see if your controller is sending signals while the sticks are completely neutral.
This will quickly diagnose persistent drift.
Here’s a simple breakdown to help you tell them apart:
| Characteristic | Controller Snapback | Stick Drift |
|---|---|---|
| When It Occurs | Immediately after releasing the stick | Continuously, even when untouched |
| Input Direction | Opposite to the last input | Often in one consistent direction |
| Duration | Momentary flick or twitch | Persistent and ongoing |
| Common Cause | High spring tension, worn parts | Worn sensors, debris, software bugs |

Why Does Snapback Happen?
The issue is purely mechanical. The analog stick module uses springs to recenter the stick. Over time, or even by design in some controllers with tight springs, the return-to-center action can be too aggressive. This is especially noticeable in fast-paced games.
“These joysticks have a known life cycle… they are rated for a certain number of cycles, and after a while they are going to wear out and they are going to fail.”– Jeff Suovanen, iFixit Teardown Engineer, The Verge
This mechanical wear is a common failure point for modern controllers that use standard potentiometers.
Newer technologies aim to solve this very problem.
You can learn more by comparing Hall Effect vs. potentiometer joysticks, which use magnets to avoid physical wear.
A pie chart showing that 40% of PS5 controller owners surveyed reported experiencing stick drift, highlighting how common analog stick issues are.
Understanding the root cause is the first step.
Now, let’s get you back in the game by exploring the software and hardware fixes that can eliminate this annoying problem for good.
Fast Facts
- Controller snapback is different from stick drift; snapback is a momentary input in the opposite direction that occurs immediately after releasing the analog stick.
- The issue is purely mechanical, caused by the stick’s spring mechanism returning to the center with too much force and overshooting the neutral position.
- Snapback and stick drift are common controller hardware failures resulting from the wear of standard components like potentiometers.
Tier 1 (Easy Fix): Adjusting Deadzone Settings on PS5 & Xbox
The easiest first step to combat controller snapback is adjusting your analog stick’s deadzone.
A deadzone is a small, central area of your stick’s axis that ignores movement.
It’s a software-level fix that can get you back in the game fast.
By slightly increasing this “dead” area, you tell your console or PC to ignore the tiny, unwanted input created when the stick snaps back to its center.
This prevents your character from aiming or moving when you’ve already let go of the stick.
Before changing any settings, it’s smart to see the snapback yourself.
Use our Gamepad Drift Test to visualize your analog stick’s return to center.
If you see the cursor overshoot the middle, you’ve confirmed snapback.
Adjusting Deadzones on an Xbox Controller
Xbox makes it easy to adjust deadzones at a system level using the Xbox Accessories app.
This change will apply to all of your games.
It’s a fantastic feature for fine-tuning your controller’s feel.
- Navigate to ‘My games & apps’ on your Xbox console and open the Xbox Accessories app.
- Select your controller and choose ‘Configure’. Create a new profile or edit an existing one.
- Go to the ‘Sticks’ tab (or ‘Left stick’/’Right stick’). Here you will find the deadzone settings.
- Choose the ‘Independent’ axis adjustment. You can now increase the outer edge of the deadzone until the snapback no longer registers.
- Save your new profile and make sure it’s assigned to a slot so it’s active.
This method is especially useful for high-end controllers.
Deadzone tweaks are a core part of the troubleshooting process, as noted in many guides on how to fix Xbox Elite Series 2 stick drift.
Adjusting Deadzones on a PS5 Controller
Unlike Xbox, the PlayStation 5 does not offer system-wide deadzone customization.
For the DualSense controller, these adjustments must be made within the settings of individual games that support this feature.
Luckily, many popular competitive titles include this crucial option.
Check the controller or settings menu in your favorite games for ‘deadzone’, ‘input threshold’, or ‘stick sensitivity’ options.
Popular games with these settings include:
- Call of Duty series (Warzone, Modern Warfare)
- Apex Legends
- Fortnite
- Rainbow Six Siege
- Rocket League
“The reason we need a dead-zone is because the analog sticks do not always return to a perfect center (0,0) when the user releases them. If there’s even a little bit of error, your character will be moving when you aren’t touching the controller.”– David Clark, Game Developer
Remember, the goal is to find a balance.
A deadzone that is too large can make precise, small movements feel sluggish or unresponsive.
Increase it just enough to eliminate the snapback, but not so much that it hurts your gameplay performance.
Fast Facts
- Adjusting your controller’s deadzone is a simple, software-level fix for analog stick snapback, where a small central area is set to ignore minor movements.
- Xbox allows for system-wide deadzone adjustments through the Xbox Accessories app, whereas on PS5, these settings must be configured within individual games that support them.
- The goal is to find a balance: increase the deadzone just enough to eliminate snapback without making small, precise stick movements feel unresponsive.
Tier 2 (Intermediate Fix): Non-Invasive Hardware Cleaning
If software tweaks did not solve your snapback, it’s time to get hands-on.
Over time, dust and grime can build up inside your analog stick module.
This debris can physically obstruct the mechanism, preventing it from returning to a true neutral position.
A simple, non-invasive cleaning can often clear this up and get your stick feeling snappy and accurate again.
Before you start, gather a few essential items. You do not need a full-blown repair kit for this method. Here’s what you will need to have ready:
- A can of compressed air
- Isopropyl alcohol (90% or higher is best)
- Cotton swabs or a small, soft brush
- A microfiber cloth
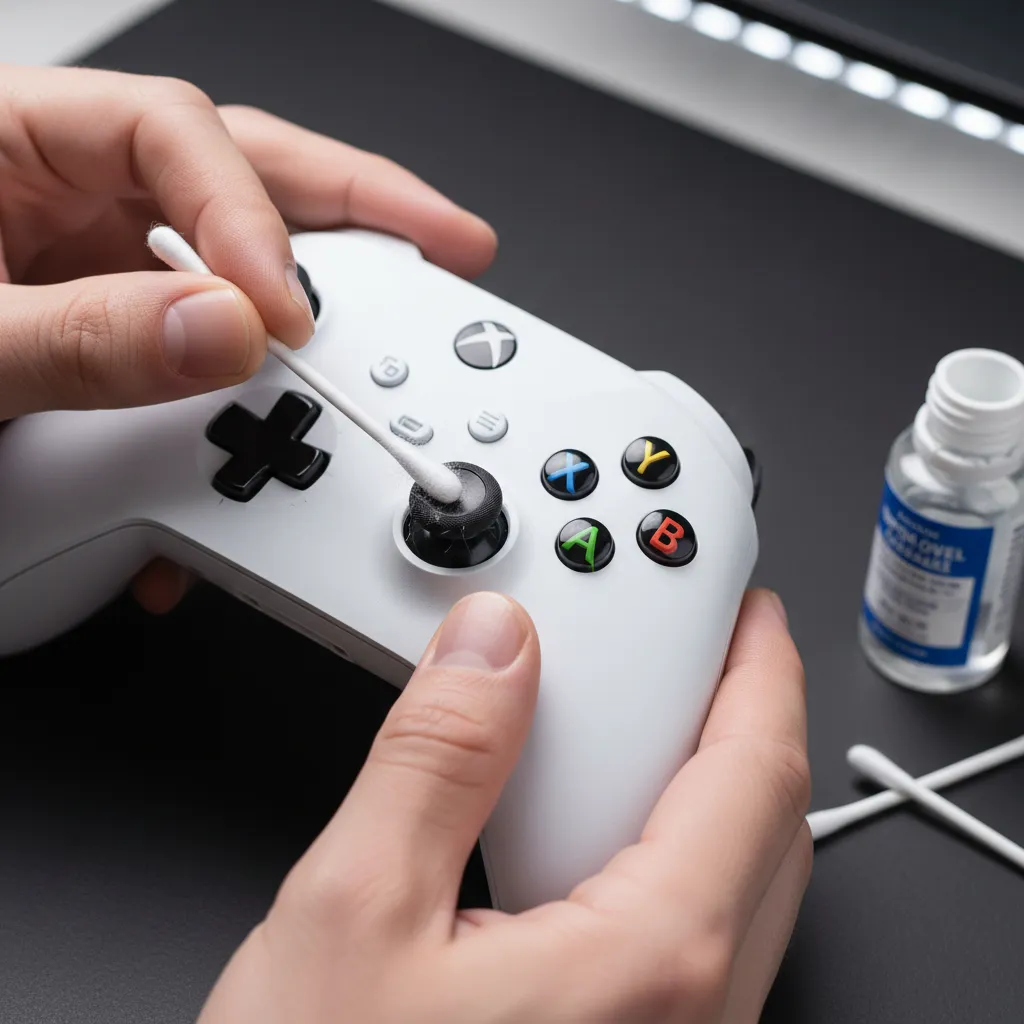
Let’s get cleaning! First, make sure your controller is completely powered off and disconnected from your console or PC. Follow these simple steps:
- Use a can of compressed air to direct short bursts around the base of the problematic analog stick. This will dislodge any loose surface-level dust.
- Apply a small amount of isopropyl alcohol to a cotton swab. It should be damp, not dripping wet. Carefully work the swab around the base of the stick.
- While the area is still damp, gently rotate the stick in a full circle multiple times and click the L3/R3 button. This helps the alcohol penetrate the mechanism.
- Let the controller air dry completely for at least 10-15 minutes. Do not power it on until you are certain all the alcohol has evaporated.
“For the best result, use 90%+ isopropyl alcohol. Isopropyl alcohol below 90% contains a higher water content, which can cause damage to electronics.”– iFixit
Once your controller is dry, it’s time for the moment of truth.
Reconnect it and head over to our comprehensive Gamepad Controller Test.
Wiggle the stick around and let it go.
See if the crosshair returns directly to the center without any overshoot.
This cleaning process is also a great way to deal with other issues, like when you need to fix sticky controller buttons without taking it apart.
If snapback persists, you may need to try a more advanced fix.
Fast Facts
- Physical debris like dust and grime inside the analog stick module can cause snapback by obstructing the mechanism’s return to a neutral position.
- A non-invasive cleaning using compressed air and high-concentration (90%+) isopropyl alcohol around the base of the analog stick can often fix the issue without disassembly.
- It is crucial to power off the controller before cleaning and allow it to dry completely for at least 10-15 minutes before powering it on again to prevent damage.
Tier 3 (Advanced Fix): Internal Hardware Modifications
If software tweaks and cleaning have not solved your snapback woes, it’s time to venture inside the controller.
This is an advanced approach that requires technical skill, the right tools, and a steady hand.
Proceed with caution, as this will void your warranty.
The primary hardware fix involves replacing the entire analog stick module.
These components, known as potentiometers, wear down over time, leading to issues like drift and snapback.
By replacing the module, you install a fresh, responsive mechanism.
Upgrading to Hall Effect Joysticks
For a more permanent solution, consider upgrading to Hall Effect joystick modules.
Instead of mechanical contacts that wear out, these use magnets and sensors to detect movement.
This design virtually eliminates drift caused by sensor wear.
This is a significant upgrade over standard parts.
To learn more about the technology behind them, explore our detailed comparison of Hall Effect vs. potentiometer joysticks and see why they are the future of controller durability.
“Soldering is an incredibly delicate process, and one wrong move could leave you with a controller that’s in worse shape than when you started.”– Jon Bitner, Digital Trends
The Replacement Process Overview
Replacing the joystick module is a delicate operation that involves soldering.
While specific steps vary between PS5 and Xbox controllers, the general process is similar.
Always find a detailed guide for your specific model before you begin.
- Disassembly: Carefully open the controller’s shell using pry tools, removing any screws and disconnecting ribbon cables.
- Desoldering: Use a soldering iron and a desoldering pump or wick to carefully remove the old joystick module from the circuit board.
- Installation: Place the new module onto the board, ensuring all pins are correctly aligned.
- Soldering: Solder the new module’s pins to the circuit board, creating clean, strong connections.
- Reassembly: Put the controller back together, reconnecting all internal components before closing the shell.
After the hardware modification, be sure to test your controller thoroughly.
Use the tools on our homepage to verify that all axes and inputs are responding correctly and that snapback is gone.
Let’s get your upgraded controller back in the game!
Cost & Difficulty: Potentiometer vs. Hall Effect Module Replacement
When software adjustments don’t solve snapback, a hardware replacement is your next step. You can either replace the stock potentiometer-based analog stick or upgrade to a modern Hall effect module. Let’s compare the cost and difficulty of each.
Potentiometer Module Replacement
This is the most direct, like-for-like repair.
A standard replacement analog stick module uses potentiometers, the same technology as the original part.
The main advantage here is the low cost, with parts often available for just a few dollars.
However, the difficulty level is very high.
The process requires you to desolder up to 14 points on the circuit board to remove the old module and then solder the new one in its place.
This is a delicate task that demands soldering experience and tools.
Hall Effect Module Upgrade
Upgrading to a Hall Effect module is the premium solution.
These modules use magnets and sensors, eliminating the physical contact that causes wear, solving issues like stick drift and often reducing snapback.
This is a permanent fix for these common analog stick issues.
The cost is higher, but the benefit is a much longer lifespan for your controller.
The installation difficulty is identical to a potentiometer replacement, as it also requires advanced soldering skills.
You’re trading a higher upfront cost for future-proof performance.
“The actual process of installing them is another matter entirely, however, as it requires some decent soldering skills.”– Robert Anderson, IGN
Which Repair is Right for You?
Your choice depends on your budget and technical comfort. To help you decide, here is a quick breakdown of the two options:
- Potentiometer Replacement:
- Cost: Very low (typically under $10).
- Difficulty: High (requires precision soldering).
- Longevity: Susceptible to the same wear and snapback issues over time.
- Hall Effect Module Upgrade:
- Cost: Moderate (typically $20-$30 for a kit).
- Difficulty: High (requires precision soldering).
- Longevity: A permanent solution that prevents future drift and often resolves snapback.
Understanding the underlying technology can make your decision easier.
Knowing exactly how joystick controllers work reveals why Hall Effect modules are a more durable, long-term fix for dedicated gamers.
Fast Facts
- Advanced hardware fixes for controller snapback involve replacing the analog stick module, a difficult process requiring soldering skills that will void the warranty.
- A standard potentiometer module is a low-cost, like-for-like replacement, while a Hall Effect module is a more expensive but permanent upgrade that eliminates wear-related issues like drift and snapback.
- Both replacement options are considered advanced repairs due to the delicate desoldering and soldering required, carrying a risk of further damaging the controller.
Level Up Your Controller Knowledge
You now know controller snapback is not a mysterious glitch but a mechanical quirk. Understanding the cause is half the battle!
Adjusting your in-game deadzone is the quickest way to fight back. It’s a simple software fix for a common hardware problem.
With these tips, you can tame that annoying stick recoil. Now go enjoy your games with the precision you deserve. Game on!
Frequently Asked Questions
Is controller snapback the same as stick drift?
No! Snapback is a quick flick in the opposite direction after releasing a stick. Stick drift is a constant, phantom input, even when untouched.
Can increasing my deadzone fix snapback?
Yes, absolutely! Raising the deadzone tells your game to ignore small inputs, like the overshoot from snapback. It is the easiest first step.
Does snapback mean my controller is broken?
Not necessarily. It is often a design characteristic of the joystick’s spring. You can usually manage it with settings before needing a repair.
Are Hall Effect joysticks immune to snapback?
While Hall Effect sticks prevent drift from sensor wear, they can still have snapback. It depends on the spring mechanism, not the sensor type.
Technical Glossary
- Controller Snapback
- A hardware issue where an analog stick, upon release, returns to the center with so much force that it overshoots the neutral position, causing a momentary, unwanted input in the opposite direction.
- Stick Drift
- A controller issue that causes a constant, phantom input from a joystick, even when the stick is not being touched.
- Analog Stick Module
- The mechanical component of a controller that uses springs to recenter the stick after movement. It is subject to wear and failure over its life cycle.
- Potentiometer
- A component used in standard analog sticks to register input. It is a common failure point due to mechanical wear from physical contact.
- Hall Effect Joysticks
- A newer joystick technology that uses magnets to register movement, which avoids the physical wear and tear common in potentiometer-based sticks.


