Hey gamers! Is that dreaded stick drift on your Xbox Elite Series 2 controller messing with your aim?
Don’t send it in for replacement just yet!
Many drift issues can be fixed at home with a few simple steps.
This guide will show you how to diagnose and repair your controller’s analog sticks, getting you back to pinpoint accuracy.
Let’s level up your controller knowledge and fix this frustrating problem for good!
TL;DR
- Confirm stick drift using a gamepad testing tool before trying any fixes to ensure an accurate diagnosis.
- Stick drift is typically caused by physical wear on internal components, dust and debris, or software calibration issues.
- Initial software-based solutions like updating firmware, recalibrating sticks, and adjusting deadzone settings can often resolve minor drift.
- A thorough physical cleaning with compressed air and isopropyl alcohol is a highly effective method for fixing stick drift without opening the controller.
Diagnosing and Understanding Elite Series 2 Stick Drift
Before you can fix the problem, you need to be certain you have one. Stick drift is when your character or camera moves in-game without you touching the analog sticks. It’s a frustrating issue, but confirming it is the first step.
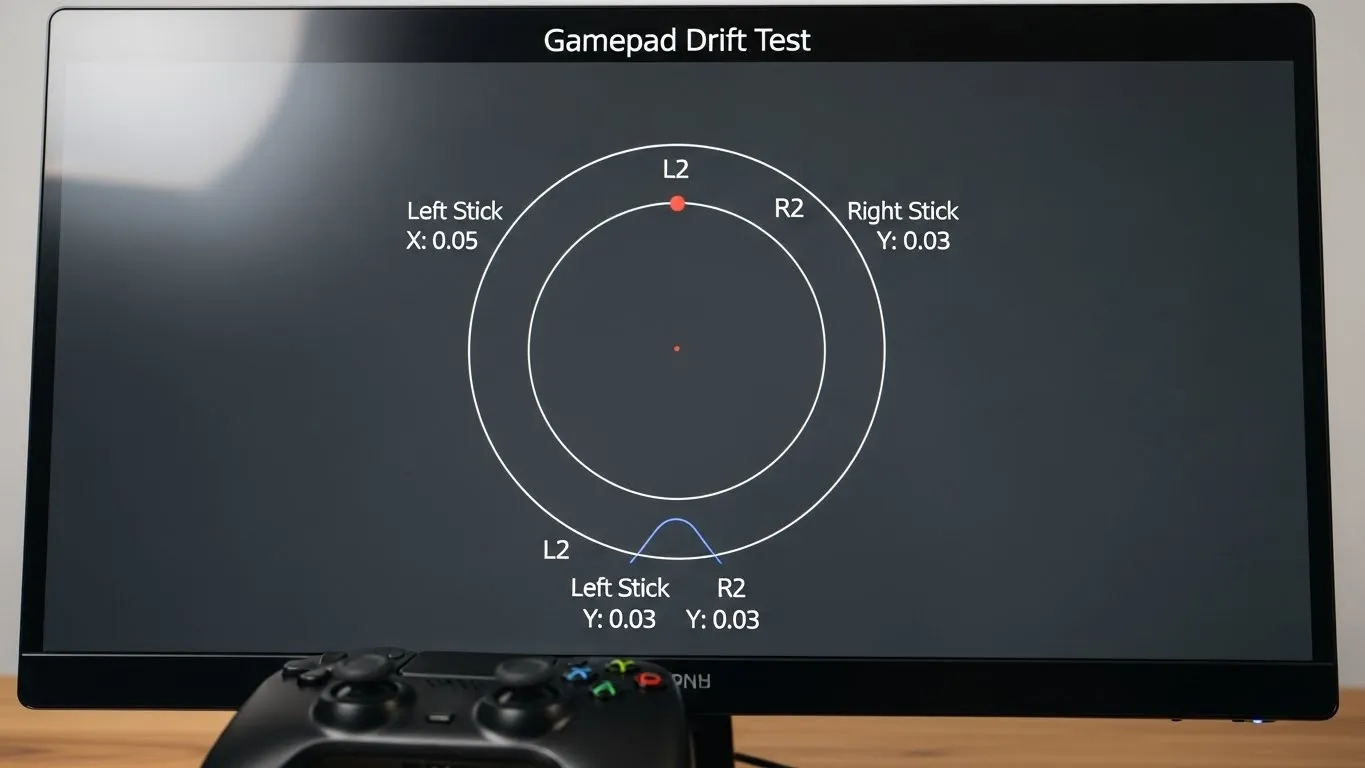
The most reliable way to check for unwanted input is to use a dedicated testing tool.
Our Gamepad Drift Test gives you a precise visual of your joystick’s position. If the on-screen dot moves from the center when your thumb is off the stick, you have drift.
What Causes Stick Drift in the Elite Series 2?
Stick drift isn’t just random bad luck.
It’s usually caused by a few specific physical and software issues working against your controller’s delicate internal components. Let’s break down the main culprits.
- Component Wear: The Elite Series 2, like most standard controllers, uses potentiometer-based joysticks. Over time, the internal wipers and resistive pads wear down, causing incorrect position readings.
- Debris and Dust: Tiny particles of dust, skin cells, and other debris can work their way into the analog stick module. This can interfere with the sensors, leading to phantom inputs.
- Firmware Glitches: Sometimes, the controller’s internal software can become corrupted or fall out of calibration, causing it to misinterpret the joystick’s neutral position.
The mechanical wear on potentiometers is a well-known issue across the industry.
Understanding how these parts work is key to preventing future problems.
You can learn more about the difference between Hall Effect vs Potentiometer Joysticks to see why this happens.
“What happens is that as you use it, the resistive material can be scraped away. The wiper then has to travel farther to achieve the same resistance, and that’s when your controller starts to drift.”– Arthur Shi,
The Verge
This issue is incredibly common in modern gamepads.
While specific data for the Elite Series 2 isn’t public, industry surveys show how widespread the problem is for similar controllers, highlighting a systemic hardware challenge.
A pie chart showing that 40% of surveyed PS5 controller owners experienced stick drift, while 60% did not, based on a 2022 survey from Which? UK.
Now that you’ve diagnosed the issue and understand the causes, let’s get you back in the game with some practical, no-replacement-needed solutions.
Fast Facts
- Stick drift is identifiable by unintended in-game movement without user input, and its presence can be accurately confirmed using a dedicated gamepad drift testing tool.
- The primary causes of Elite Series 2 stick drift include component wear in potentiometer-based joysticks, interference from debris and dust, and occasional firmware glitches.
- Mechanical wear on potentiometer joysticks, a key cause of drift, is a common and widespread hardware issue affecting many modern gamepads across the industry, not just the Elite Series 2.
Step-by-Step Non-Replacement Fixes
Stick drift on a premium controller like the Elite Series 2 is frustrating.
But don’t worry; you have several options to try before thinking about a replacement.
Let’s get you back in the game with these step-by-step fixes.
Software Adjustments for a Quick Fix
Before touching any hardware, let’s start with the easiest solutions. These are managed through your console or PC and can often resolve minor drift issues caused by software or calibration errors.
1. Update Your Controller’s Firmware
Microsoft frequently releases firmware updates that can improve performance and fix bugs. Ensuring your controller is up to date is a crucial first step.
Connect your controller and check for updates in the Xbox Accessories app.
2. Recalibrate Your Joysticks
Over time, the center point of your analog sticks can shift. Recalibrating them resets this center point.
Use the Xbox Accessories app on your console or PC to run through the calibration process for your thumbsticks.
3. Adjust the Deadzone Settings
A deadzone is an area around the center of the analog stick where movement is not registered. Increasing the deadzone can mask minor drift.
You can test the severity of your issue with our Gamepad Drift Test tool.
After testing, adjust the deadzone settings either within the Xbox Accessories app or in the settings of specific games. This tells the game to ignore small, unwanted inputs from drift.
Physical Cleaning: The Most Common Fix
The most common cause of stick drift is dust, debris, or grime getting into the analog stick mechanism. A thorough cleaning can often solve the problem completely without needing to open the controller.
“Every time you move the stick, the wiper moves along the track. This causes the two parts to wear down over time, just like the treads on your car’s tires.”– Kevin O’Reilly, iFixit
This wear on internal potentiometers creates dust that can interfere with the sensors. Cleaning helps remove this residue.
For a deeper dive into the tech, you can learn the difference between Hall Effect vs. potentiometer joysticks.
How to Clean Your Analog Sticks
- Gather your tools: You will need a can of compressed air, cotton swabs, and isopropyl alcohol (90% or higher is best).
- Power down: Make sure your controller is turned off and disconnected from any power source.
- Use compressed air: Hold the stick to one side and use short bursts of compressed air to blow out any loose debris from the base of the mechanism. Repeat this from all angles.
- Apply alcohol: Lightly dampen a cotton swab with isopropyl alcohol. Do not oversaturate it. Gently wipe around the ball and base of the analog stick, cleaning any visible grime.
- Work it in: Rotate the analog stick in a circular motion for 30 seconds to help the alcohol clean the internal components. Click the stick down a few times as well.
- Let it dry: Wait at least 15-20 minutes for the alcohol to evaporate completely before turning your controller back on.
After cleaning, be sure to test your controller again. This simple process often resolves even stubborn cases of stick drift.
| Fix Method | Difficulty | Tools Needed | Potential Success |
|---|---|---|---|
| Firmware Update | Easy | Xbox/PC | Low |
| Recalibration | Easy | Xbox/PC | Medium |
| Deadzone Adjustment | Easy | Xbox/PC, In-Game Menus | High (Workaround) |
| Cleaning | Medium | Compressed Air, Alcohol | High |
Software-Based Solutions: Calibration, Deadzone, Firmware
Before you think about opening up your controller, let’s tackle the easy stuff.
Software adjustments can often fix or at least reduce stick drift without any tools.
Let’s level up your controller’s settings!
Keep Your Controller Firmware Updated
Manufacturers release firmware updates to improve performance and fix bugs.
An outdated firmware could be the source of your woes.
Keeping it current is your first, best step. It is a quick and simple process.
- Connect your Elite Series 2 controller to your Xbox or Windows PC.
- Open the Xbox Accessories app.
- If an update is available, you will see a notification. Select it to begin.
- Keep the controller still and connected until the update is complete.
Once updated, it’s a great idea to check its performance. A quick run through our main Gamepad Controller Test will show if the update has improved your analog stick accuracy.
Recalibrate Your Thumbsticks
Sometimes your controller just needs a reminder of what “center” is.
Recalibration resets the joystick’s neutral position, which can correct minor drift issues caused by software misinterpretation. This is a powerful, non-invasive fix.
“Recalibrating your thumbsticks can resolve issues such as stick drift. Note that recalibrating your thumbsticks will not resolve issues that are caused by wear and tear.”– Xbox Support
The Xbox Accessories app is your command center for this. Navigate to your controller’s configuration profile, find the calibration options for the thumbsticks, and follow the on-screen instructions carefully.
Adjust Analog Stick Deadzones
Think of a deadzone as a small “no-input” area around the center of the stick.
Increasing the deadzone tells your console or PC to ignore minor movements. This is a fantastic workaround for persistent drift.
You can adjust deadzone settings directly in the Xbox Accessories app. Here’s how:
- Open the app and select Configure for your Elite Series 2.
- Create a new profile or edit an existing one.
- Go to the Sticks tab. Under Left stick or Right stick, adjust the Calculation.
- Slightly increase the deadzone size and test again. Repeat until the drift is gone.
Many games also offer their own deadzone settings. If you only experience drift in one game, check its controller options first.
This allows for a more tailored fix without affecting your other games.
Hardware Cleaning: Tools, Risks, and Instructions
Before you resign yourself to a faulty controller, let’s try a hands-on approach.
Often, stick drift is simply caused by dust, dirt, or tiny debris getting inside the analog stick mechanism.
A thorough cleaning can work wonders.
This process can restore your joystick’s accuracy.
We’ll cover two methods: one that is completely safe and another for those willing to take a small risk for a deeper clean.
Let’s get your controller back in pristine condition!
Essential Tools for Cleaning
Having the right gear makes all the difference.
You won’t need a full workshop, just a few key items.
Gather these before you begin to ensure a smooth and effective cleaning process for your Elite Series 2 controller.
- Can of compressed air
- Isopropyl alcohol (90% or higher is ideal)
- Cotton swabs or Q-tips
- A soft, lint-free microfiber cloth
- Plastic prying tool (optional, for deep cleaning)
- T8 Torx security screwdriver (optional, for deep cleaning)
Risks and Important Precautions
Proceed with caution!
Attempting to open your controller will almost certainly void its warranty.
Be gentle with all components, as the internal parts and ribbon cables can be very delicate.
Always disconnect the controller before you start.
“Compressed air is your best friend for a deep clean, but it can also be dangerous if you use it incorrectly. Always hold the can upright… Never shake the can, and always do short bursts of air.”– Jesse Lennox,
Digital Trends
Step-by-Step Cleaning Instructions
Start with the simplest method first.
Often, an external cleaning is all that’s needed to dislodge the debris causing the issue.
If drift persists, you can then consider the more advanced internal cleaning method.
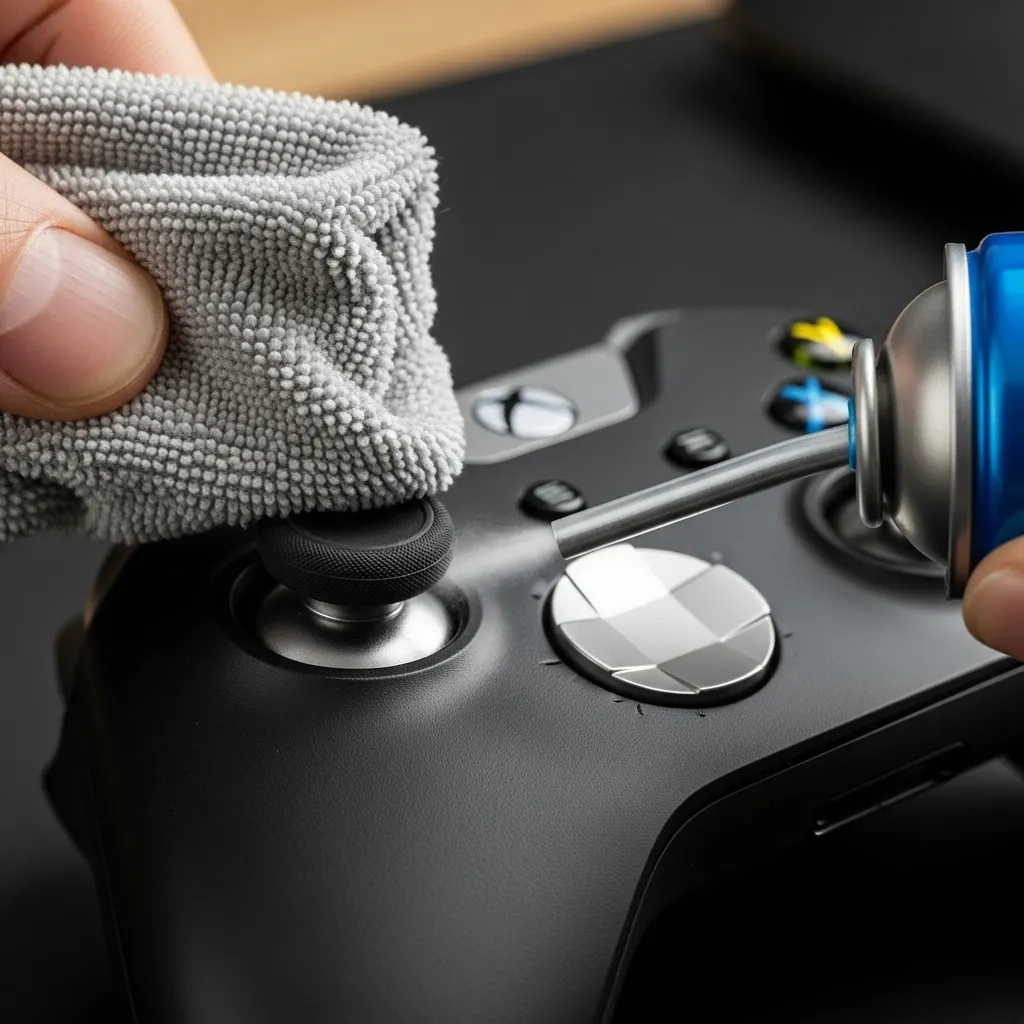
Method 1: External Cleaning (No Disassembly)
- Power Off: Make sure your controller is completely turned off and disconnected from any device.
- Compressed Air: Hold the can of compressed air upright. Aim the nozzle at the base of the analog stick. Use short, controlled bursts of air to blow out any loose dust and debris.
- Work the Stick: As you spray, gently click and rotate the analog stick through its full range of motion. This helps dislodge particles from different angles within the mechanism.
- Wipe Down: Use a microfiber cloth slightly dampened with isopropyl alcohol to clean the exterior of the joystick and the surrounding area.
Method 2: Internal Cleaning (Disassembly Required)
This method offers a more thorough cleaning but carries the risk of voiding your warranty. Only proceed if you are comfortable opening electronic devices.
This process gets closer to the sensors explained in guides about how joystick controllers work.
- Remove Faceplate: Carefully use a plastic prying tool to gently unclip and remove the controller’s faceplate, exposing the internal components around the analog sticks.
- Targeted Alcohol Application: Dip a cotton swab in isopropyl alcohol, ensuring it is damp but not dripping wet. Carefully swab the base and visible internal parts of the joystick module.
- Clean the Sensor Area: Gently clean around the small electronic components of the stick’s base. This is where dust can disrupt the potentiometer’s readings, causing drift.
- Air Dry Completely: Allow the alcohol to evaporate completely for at least 10-15 minutes before you reassemble the controller. Patience is key to preventing any liquid damage.
Verify the Fix
After cleaning and reassembling your controller, it’s time for the moment of truth.
You need to test if the stick drift is gone. Don’t just jump into a game; get a precise reading first.
Connect your controller to your PC and use the main Gamepad Controller Test.
Move the stick around and check the visualizer to see if it returns to the center and stays there. This will confirm if your cleaning was a success.
Fast Facts
- Begin by attempting software-based solutions like updating firmware, recalibrating joysticks, and adjusting deadzone settings, as these are easy first steps for minor stick drift.
- The most common and often effective non-replacement fix for stick drift is a thorough physical cleaning of the analog stick mechanism using compressed air and isopropyl alcohol to remove dust and debris.
- A combination of these software adjustments and physical cleaning methods provides a strong chance of resolving stick drift issues without needing to replace the controller.
Proactive Prevention and Maintenance
The best way to fix stick drift is to prevent it from ever happening.
Consistent care and maintenance can dramatically increase your Elite Series 2 controller’s lifespan.
Let’s level up your controller care routine.
Establish a Regular Cleaning Schedule
Over time, dust, skin oils, and tiny debris can work their way into the analog stick modules. This buildup is a primary cause of erratic behavior.
A simple cleaning routine can keep these components pristine.
Follow these steps every few weeks to keep your gamepad in top shape. It only takes a few minutes and can save you a major headache down the road.
- Wipe Down: Use a dry microfiber cloth to wipe the entire controller, paying special attention to the seams around the thumbsticks.
- Compressed Air: Hold the controller with the stick tilted to one side. Use short bursts of compressed air to blow debris out of the exposed mechanism.
- Isopropyl Alcohol: For tougher grime, apply a small amount of 90%+ isopropyl alcohol to a cotton swab and carefully clean around the base of the stick.
Proper Handling and Storage Habits
How you handle and store your controller matters.
The Elite Series 2 comes with a fantastic case for a reason. Using it is the first line of defense against dust and accidental drops, which can cause internal damage.
Avoid placing heavy objects on your controller or being overly aggressive with the sticks during intense gameplay.
Understanding how joystick controllers work reveals that these are sensitive mechanical parts with a finite lifespan.
“The two main culprits are usually dust and grime working its way inside the moving parts, and shock damage from the controller being dropped.”– Chris Koster, IGN
Software Tweaks for Longevity
You can also use software settings to prevent minor wear from becoming a problem.
Many games allow you to adjust the “deadzone” for your analog sticks.
Increasing this slightly creates a small neutral area around the center of the stick.
This means tiny, unintentional movements from a slightly worn stick won’t be registered in-game.
It’s a great proactive measure to get more life out of your hardware.
For more ideas, explore our general gamepad controllers tips and tricks.
After cleaning, run your gamepad through a quick test.
Check the analog sticks and even use the Gamepad Trigger Pressure Test to ensure all components are responding perfectly.
Regular checks help you catch issues early.
Fast Facts
- Implement a regular cleaning schedule using microfiber cloths, compressed air, and isopropyl alcohol to prevent dust and debris buildup in analog sticks.
- Practice proper handling and storage habits, such as using the controller’s case and avoiding aggressive use or drops, to prevent physical damage.
- Utilize software settings like increasing the analog stick ‘deadzone’ in games to compensate for minor wear and extend the controller’s lifespan.
Conclusion
You’ve just leveled up your controller knowledge! Stick drift doesn’t have to mean a costly replacement for your Elite Series 2.
By starting with software adjustments and moving to careful cleaning, you can often solve the problem yourself.
These fixes save you money and get you back in the game fast. Now go out there and enjoy that drift-free precision!
Frequently Asked Questions
Why is stick drift so common on the Elite Series 2?
It’s mainly due to the joystick design. The internal components, called potentiometers, wear down with use, causing inaccurate readings.
Will cleaning my controller void the warranty?
Using compressed air on the outside is perfectly safe. However, opening the controller’s shell to clean it internally will void your warranty.
How often should I try recalibrating my controller?
Recalibrate whenever you notice any phantom movement, no matter how small. It’s the best first step to take before trying a hardware fix.
What if none of these fixes work?
If software tweaks and cleaning don’t help, the internal joystick module may be too worn. At that point, a professional repair or replacement is the next step.
Technical Glossary
- Stick Drift
- A phenomenon where a character or camera moves in-game without the user touching the analog sticks.
- Potentiometer-based Joysticks
- A type of analog stick mechanism that relies on internal wipers and resistive pads to read its position. The wear of these components is a primary cause of stick drift.
- Component Wear
- The physical degradation of a controller’s internal parts over time, such as the wipers and resistive pads in a joystick, which causes incorrect position readings.
- Firmware Glitches
- A software issue where a controller’s internal program becomes corrupted or falls out of calibration, leading it to misinterpret the joystick’s neutral position.
- Analog Stick
- The physical joystick on a controller used to control in-game movement. Unwanted input from this component results in stick drift.


