Is that satisfying ‘click’ from your controller now a sad ‘squish’? Mushy buttons are a gamer’s nightmare, causing slow, unreliable inputs.
Don’t let it ruin your game! This guide will show you exactly how to prevent your buttons from becoming unresponsive and keep your controller in peak condition.
Let’s level up your controller knowledge and ensure your inputs stay crisp and tactile!
TL;DR
- The primary cause of mushy buttons is material fatigue in the internal silicone membrane, which loses its springiness over thousands of presses.
- External contaminants like dust, crumbs, and dried spills can get trapped around buttons, obstructing their movement and causing a sticky or unresponsive feel.
- Implementing a simple, regular maintenance routine, such as wiping the controller after each use and performing a weekly deep clean, can dramatically extend button life.
The Science Behind Mushy Buttons: Material Degradation & Core Causes
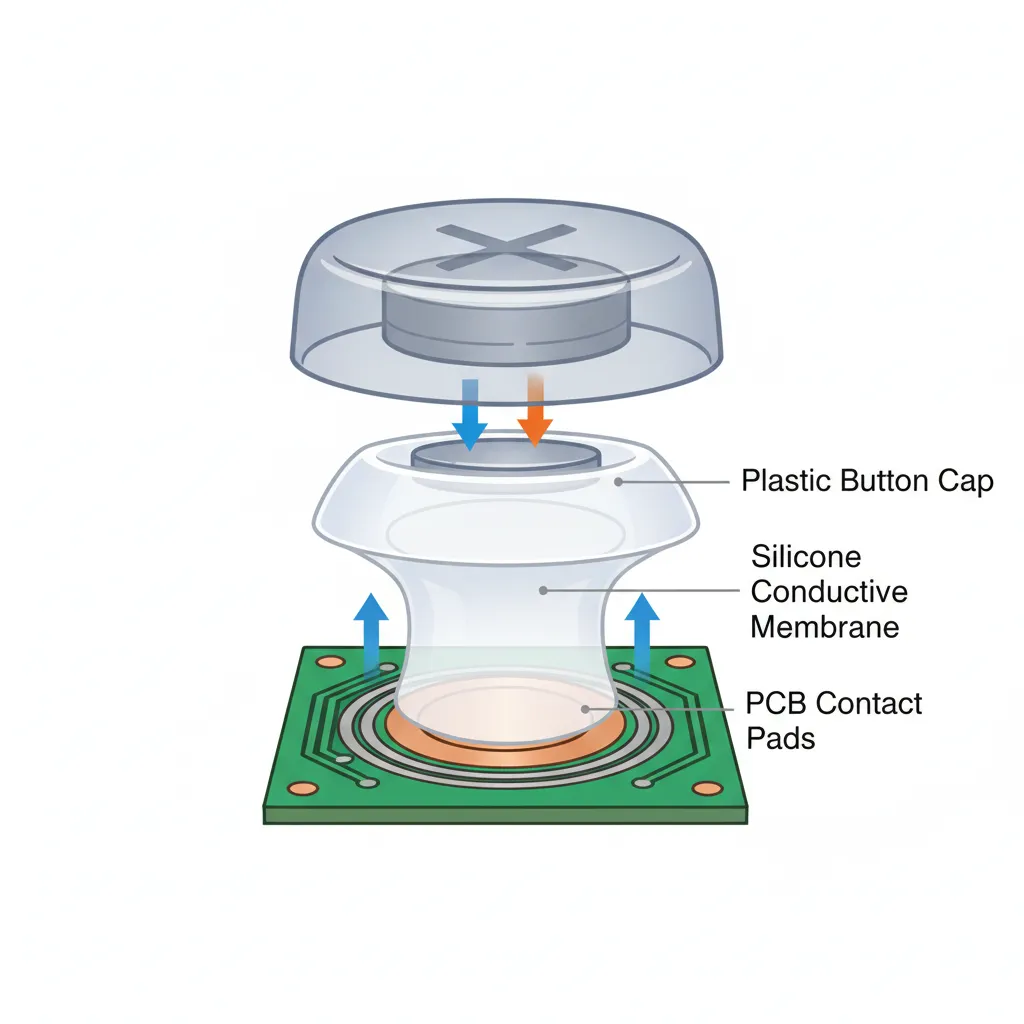
Ever wonder what actually happens when a button loses its satisfying click? It’s not just in your head. The crisp, tactile response you love comes from a simple but crucial component: a silicone membrane beneath the plastic button.
This membrane has a small, conductive pad on its underside. When you press the button, it pushes this pad down to make contact with the circuit board (PCB), registering your input. The silicone’s natural springiness is what pushes the button back up.
Material Fatigue: The Main Culprit
The primary cause of mushy buttons is material fatigue. Think of that silicone membrane like a tiny trampoline. Over thousands of presses, the material stretches and compresses, gradually losing its elasticity. It can no longer “snap” back into place with the same force.
This gradual degradation is why buttons feel less responsive over time. The membrane becomes soft and worn, resulting in that dreaded mushy sensation where the button press feels vague and unsatisfying.
“The stock rubber membranes found in first-party controllers have a history of having a low-tactility feel. These membranes provide a squishy and non-committal feeling that we feel holds players back…”– Battle Beaver
Debris and Contaminants
Besides normal wear, external factors are a major enemy of crisp buttons.
Dust, crumbs, and dried liquids can work their way into the controller’s shell. This debris gets trapped around the button or under the membrane, physically obstructing its movement.
This build-up prevents the button from depressing fully or returning properly, leading to a sticky or mushy feel. If you are dealing with this, learning how to fix sticky controller buttons without taking it apart can be a game-changer for restoring that responsive feel.
A pie chart showing that 39% of early Nintendo Switch owners experienced Joy-Con drift, while 61% did not, illustrating how common component failure can be in controllers.
This type of component failure isn’t unique to buttons. Analog stick drift, another common issue, often stems from the degradation of internal parts. Understanding how different joystick technologies work, like in the Hall Effect vs potentiometer joysticks debate, shows how material choice impacts longevity.
Here’s a breakdown of the common causes and their effects:
| Cause of Mushiness | Primary Component Affected | Resulting Feel |
|---|---|---|
| Mechanical Wear | Silicone Membrane | Soft, unresponsive, lacks “snap” |
| Dirt & Debris | Button Housing & Membrane | Sticky, slow return, gritty |
| Liquid Spills | Membrane & PCB Contacts | Very sticky, may not register input |
| Extreme Heat/Humidity | Silicone Membrane | Premature softening and degradation |
Fast Facts
- The primary cause of mushy buttons is material fatigue of the silicone membrane, which loses its elasticity and “snap” over repeated presses, leading to a soft and unresponsive feel.
- External contaminants like dust, crumbs, and dried liquids can obstruct button movement or get trapped under the membrane, causing stickiness and preventing proper return.
- Environmental factors such as extreme heat and humidity can also accelerate the degradation and softening of the silicone membrane, contributing to premature button mushiness.
Tiered Preventative Maintenance: A Schedule for Long-Lasting Controllers
The best defense against mushy buttons is a good offense.
Setting up a simple, regular maintenance routine can dramatically extend the life of your controller and keep every button press feeling crisp and responsive.
Let’s build a schedule to protect your gear.
After Each Gaming Session: The Quick Wipe
This takes less than 30 seconds.
After you finish playing, grab a dry microfiber cloth and give your controller a quick wipe-down. This simple habit removes sweat, oils, and surface dust before they have a chance to work their way into the button housing.
Weekly Check-In: The Light Clean
Once a week, dedicate five minutes to a more focused cleaning.
Use a soft-bristled brush or a toothpick to gently clear debris from the seams around your buttons and analog sticks. For grime, slightly dampen a cloth with water to wipe down the shell.
This is also a great time to address any early signs of stickiness.
If you notice a button starting to lag, you can often solve it with simple, external cleaning methods. We have a full guide on how to fix sticky controller buttons without taking it apart.
“For cleaning the controllers, use a soft cloth dampened with a 70% or less isopropyl alcohol (IPA) solution. … Do not apply liquid directly to your product.”– Microsoft, Clean and care for your Xbox console and controllers
Monthly Deep Dive: The Performance Tune-Up
Set aside time once a month for a deeper clean and a full diagnostic.
Use a can of compressed air to blow out any stubborn dust from beneath the face buttons and D-pad. Be sure to use short bursts to prevent moisture buildup from the propellant.
After cleaning, plug in your controller and run it through our complete Gamepad Controller Test. This allows you to verify that every single button, trigger, and stick is registering perfectly, ensuring your maintenance is paying off.
Level 1: Regular Surface Care & Initial Checks
The best defense against mushy buttons is a good offense. Keeping your controller clean from the start is the easiest way to preserve that crisp, tactile feedback you love.
Let’s get into the basics of proactive care.
Wipe It Down Regularly
Dust, skin cells, and snack residue are the primary enemies.
After every few gaming sessions, give your controller a quick wipe. Use a soft, dry microfiber cloth to clean the shell and around the buttons.
For tougher grime, you can slightly dampen the cloth with water. Be sure to wring it out completely, as excess moisture is a hazard.
This simple habit helps prevent buildup that can lead to sticky or unresponsive buttons over time.
“To clean your Nintendo products, use a soft, dry cloth. Do not use chemical agents such as benzene or thinner, or alcohol, as this can damage the products.”– Nintendo Support, How to Clean Nintendo Products
Run a Quick Diagnostic
Before you even notice a problem, get a feel for your controller’s baseline performance.
A quick diagnostic can help you spot early signs of trouble.
It establishes how your buttons should feel and respond.
The easiest way to do this is with our online tool.
Plug in your controller and use the Gamepad Controller Test to see if every press registers instantly and accurately.
A healthy button has zero delay.
Surface Care Do’s and Don’ts
Keep these simple rules in mind to extend the life of your buttons:
- DO: Wash your hands before long gaming sessions to reduce oil transfer.
- DON’T: Eat greasy or messy snacks while playing. Crumbs are a button’s worst nightmare.
- DO: Store your controller in a clean, dry place away from direct sunlight.
- DON’T: Use harsh chemical cleaners, alcohol wipes, or abrasive materials on the controller’s surface.
Level 2: Deep Internal Cleaning & Component Inspection
If external cleaning didn’t restore that satisfying click, it’s time to go deeper.
This step involves disassembling your controller and is for the more technically inclined. Be aware that this will almost certainly void your warranty.
If you’re not ready to open your controller, you can first learn how to fix sticky controller buttons without taking it apart.
For those ready to proceed, let’s gear up.
You’ll need a specific toolkit, usually with small screwdrivers and plastic prying tools.
Cleaning the Button Assembly
Once you have the controller open, you can access the components responsible for button presses. The primary parts to focus on are the silicone membranes, the buttons themselves, and the printed circuit board (PCB) contacts.
- Silicone Membranes: These are the rubbery pads under the plastic buttons. Carefully lift them out and clean them with a cotton swab lightly dampened with 90%+ isopropyl alcohol.
- PCB Contacts: On the circuit board, you’ll see gold or carbon contacts where the membranes press down. Gently wipe these with a clean swab and a tiny amount of alcohol to remove any residue.
- Plastic Buttons: Clean the individual plastic buttons and their housing slots in the controller’s shell. Dust and grime can build up here, causing friction and a mushy feel.
“It’s easy to accidentally pull a ribbon cable out of its ZIF connector. If you do, use tweezers to flip up the tiny black or white tab on the connector to re-seat the cable.”– Staff, iFixit
Inspecting Components for Wear
While cleaning, take the opportunity to inspect the silicone membranes for damage.
Over thousands of presses, these membranes can tear or lose their elasticity.
This physical wear is a common cause of a permanently mushy or unresponsive button.
If you spot a tear or the rubber feels overly soft and worn, cleaning alone won’t solve the issue. The good news is that replacement membranes for most popular controllers are widely available online and are an inexpensive fix.
After a thorough cleaning and reassembly, be sure to use a tool like the Gamepad Trigger Pressure Test to ensure every input is registering perfectly. This confirms your deep clean was a success and your buttons are back in top form.
Level 3: Proactive Upgrades for Enhanced Durability
For gamers seeking peak performance, waiting for problems isn’t an option. Proactive hardware upgrades can stop mushy buttons before they start, giving you a superior feel and longer lifespan for your favorite joypad.
Upgrading Internal Components
Venturing inside your controller opens up a world of customization. Swapping out stock parts for higher-quality alternatives is the ultimate way to ensure a crisp, responsive feel for the long haul.
Let’s level up your hardware knowledge.
- Aftermarket Buttons: Replace standard plastic buttons with custom-molded ones or even metal alternatives. These offer superior durability and can provide a different tactile feel and aesthetic.
- Conductive Rubber Pads: The silicone membrane beneath your buttons is the most common cause of mushiness. High-quality replacement pads can restore that satisfying, out-of-the-box clickiness.
- Mechanical Switch Mods: For the truly dedicated, soldering kits can replace membrane contacts with “clicky” mechanical switches, similar to those in gaming keyboards. This offers maximum tactility and durability.
These modifications require some technical skill. If you’re tackling a similar project, like a noisy D-pad, our Xbox Series X|S D-pad clicking repair guide can provide insight into the disassembly process.
“The Mecha-Tactile Action Buttons and D-Pad feel superb, delivering a satisfyingly clicky experience that’s a far cry from the mushy membrane buttons found on many standard controllers.”– Rhys Wood, TechRadar
Test Your Upgrades Rigorously
After performing any internal modification, it’s crucial to test every function.
You need to ensure all buttons register correctly and feel as expected under pressure.
A thorough test guarantees your hard work pays off in-game.
Confirm your new buttons are perfectly calibrated by running a quick check.
The Gamepad Trigger Pressure Test is excellent for ensuring every input is registered precisely, from a light tap to a full press.
Fast Facts
- Implement a tiered and regular maintenance schedule for your controller, including a quick wipe after each session, a light clean weekly, and a deeper clean monthly.
- Use appropriate cleaning tools and methods, such as dry microfiber cloths, soft-bristled brushes, and compressed air, while carefully avoiding harsh chemicals or direct liquid application to prevent damage.
- Proactively monitor controller performance by running diagnostics regularly to detect and address any signs of sticky buttons or input lag early, ensuring lasting responsiveness.
Keep Your Clicks Crisp & Your Inputs Clean
You’re now equipped to fight back against mushy buttons! It’s all about the silicone membrane and keeping debris out.
Proactive care is your best strategy. Regular cleaning and gentle use can dramatically extend the life of your controller’s tactile feel.
Don’t let worn-out buttons compromise your gameplay. Let’s get you back in the game with that satisfying click for years to come!
Frequently Asked Questions
Why do some new controllers already feel mushy?
It often comes down to the stock silicone membranes. Some are simply designed for a softer, less tactile feel right out of the box.
Can I fix mushy buttons without taking the controller apart?
For dirt and stickiness, yes! Isopropyl alcohol and compressed air can work wonders. For internal wear, disassembly is usually needed.
Does pressing buttons harder make them wear out faster?
Absolutely. Mashing buttons accelerates the fatigue of the silicone membrane, causing it to lose its springiness and become mushy sooner.
Are some controllers more prone to getting mushy buttons?
Yes. Build quality varies. Controllers with less durable membranes or shells that easily trap dust and grime will degrade more quickly.
Technical Glossary
- Silicone Membrane
- A crucial component beneath a plastic button, made of silicone, whose natural springiness provides the tactile response and pushes the button back up after a press.
- Conductive Pad
- A small pad on the underside of the silicone membrane that makes physical contact with the circuit board (PCB) to register an input when the button is pressed.
- Circuit Board (PCB)
- The electronic board within a controller or device that the conductive pad touches to complete a circuit, thereby registering the button press as an input.
- Material Fatigue
- The primary cause of mushy buttons, where a material like silicone gradually loses its elasticity and ability to ‘snap’ back into place after being repeatedly stretched and compressed over thousands of uses.
- Analog Stick Drift
- A common controller issue, mentioned as analogous to button failure, where a joystick registers input even when it is not being moved, often due to the degradation of internal components.


