Table of Contents
- Getting Started: Universal Gamepad Connection (USB & Bluetooth)
- The One-Time Setup: Initial Configuration in EmulationStation
- Advanced Mapping: Customizing Controls Per Emulator via RetroArch
- Essential Hotkeys: Mastering In-Game Functions (Save/Load, Exit)
- Troubleshooting Common Issues: From Detection to Input Lag
- Conclusion
- Frequently Asked Questions
So you’ve built your Raspberry Pi retro console, but the controller setup is proving to be a final boss?
No problem!
This guide is your ultimate walkthrough for connecting any gamepad, from classic USB pads to modern Bluetooth controllers.
We’ll crush configuration issues and get you button-mashing in no time.
Let’s level up your controller knowledge and get you back in the game!
TL;DR
- You can connect gamepads to a Raspberry Pi using either a wired USB connection for plug-and-play simplicity or a wireless Bluetooth connection for convenience.
- USB controllers offer the lowest input lag, making them ideal for performance-focused retro gaming, while Bluetooth offers freedom from cables but requires an initial pairing process.
- The first time you connect a new controller, you will need to complete a one-time button mapping configuration within EmulationStation.
- To configure your controller, hold down any button to start the mapping process and follow the on-screen prompts to assign actions to each button, D-pad, and analog stick.
Getting Started: Universal Gamepad Connection (USB & Bluetooth)
Let’s get your retro rig ready for action! Your Raspberry Pi is a versatile machine that welcomes most modern gamepads. You have two primary ways to connect your controller: the classic wired USB or the convenient wireless Bluetooth.
Connecting a USB Gamepad
For a true plug-and-play experience, a wired USB controller is your best bet. It’s the simplest method and often provides the lowest input lag, which is crucial for pixel-perfect retro gaming. Most generic USB gamepads work right out of the box.
- Power on your Raspberry Pi running your chosen retro gaming OS (like RetroPie or Batocera).
- Plug your USB controller directly into an available USB port on the Raspberry Pi.
- The system should automatically detect the gamepad.
- Follow the on-screen prompts to configure your buttons for the first time.
Once connected, it’s a great idea to run a quick check.
Use our online Gamepad Controller Test to ensure every button, trigger, and analog stick responds perfectly before you jump into a game.
Pairing a Bluetooth Gamepad
Want to game from the couch without tangled wires? A Bluetooth controller is the way to go. The pairing process takes a few extra steps but gives you total freedom of movement. Many popular controllers like the DualShock 4 or 8BitDo are great choices.
- Navigate to the Bluetooth configuration menu within your retro gaming software.
- Put your controller into pairing mode. This process varies by model, so check its manual (it often involves holding a specific button).
- Select “Search for Bluetooth Devices” on your Raspberry Pi.
- Choose your gamepad from the list of discovered devices and select “Pair.”
- Follow any on-screen instructions to complete the setup and configure your buttons.

“Most generic USB controllers will work with the Raspberry Pi without any need for drivers.”– Raspberry Pi Foundation, Official Gaming Documentation
Wired vs. Wireless: Which is Best for You?
Choosing between a wired or wireless connection often comes down to personal preference.
Latency is a key factor for many retro enthusiasts.
A wired connection typically offers the most stable and responsive experience.
However, modern wireless technology has improved significantly, making it a very viable option.
For a deeper dive into how connection types affect performance, check out our wired vs. wireless controller guide.
| Feature | USB (Wired) | Bluetooth (Wireless) |
|---|---|---|
| Latency | Lowest Possible | Slightly Higher |
| Convenience | Limited by Cable | High (No Wires) ✅ |
| Setup | Plug and Play ✅ | Requires Pairing |
| Power | Powered by USB | Requires Batteries/Charging ❌ |
The gaming market reflects a strong preference for freedom from cables.
According to Grand View Research, the wireless segment dominated the gaming controller market, accounting for over 70% of revenue in 2022, a trend that continues to grow.
A pie chart showing the gaming controller market share in 2022: Wireless controllers hold a 70% share, while Wired controllers account for the remaining 30%.
Fast Facts
- You can connect gamepads to a Raspberry Pi using either a simple, low-latency wired USB connection or a more convenient wireless Bluetooth connection.
- USB controllers offer a ‘plug-and-play’ experience with minimal input lag, making them ideal for performance-focused retro gaming.
- Bluetooth controllers provide freedom from wires but require an initial pairing process and battery management, trading simplicity for convenience.
The One-Time Setup: Initial Configuration in EmulationStation
Welcome to EmulationStation!
The first time you boot it with a new controller connected, you’ll be greeted by a configuration screen.
Let’s get this one-time setup done so you can jump into your favorite retro classics.
Mapping Your Gamepad Buttons
This process tells EmulationStation what each button on your controller should do.
The process is straightforward and only needs to be done once per controller.
Just follow the on-screen prompts carefully.
- Initiate Configuration: The screen will say “Welcome… No Gamepads Detected.” Simply press and hold any button on your controller to begin the mapping process.
- Follow the Prompts: EmulationStation will now ask you to press specific buttons, one by one. This includes D-Pad directions, Start, Select, face buttons (A, B, X, Y), and shoulder buttons.
- Skipping Buttons: Don’t worry if your gamepad doesn’t have every button listed. To skip a button you don’t have, just press and hold any already-configured button for a second.
- Set Your Hotkey: This is the most important step! The Hotkey is a special button you’ll hold down in combination with other buttons to access key functions like saving, loading, and exiting games.
- Confirm and Save: Once you’ve mapped all your buttons, you’ll be prompted to press the ‘A’ button (or whatever you mapped as ‘OK’) to save the configuration. That’s it!
“Choosing your hotkey is important, as you’ll need it to exit games and access other features. The Select button is a popular choice, but any button will do.”– Kelsey Quail, Howchoo
Verify Your Setup Before Playing
Once configured in EmulationStation, it’s a great idea to double-check everything.
This ensures that every axis and input is recognized correctly, so you won’t discover an unresponsive button in the middle of a game.
You can perform a quick and thorough check using an online tool.
Running a full Gamepad Controller Test will give you visual feedback on every button press and stick movement, confirming your setup is flawless.
Fast Facts
- Initial controller setup in EmulationStation is a one-time process per device, started by holding a button and following on-screen mapping prompts.
- Setting a ‘Hotkey’ is the most critical step, as this button is required in combination with others to access key functions like saving, loading, and exiting games.
- It is recommended to verify your controller’s configuration with a testing tool after setup to ensure all buttons and axes function correctly before playing.
Advanced Mapping: Customizing Controls Per Emulator via RetroArch
While a global controller configuration is a great start, the real magic happens when you tailor your controls for each classic console.
After all, a Sega Genesis layout feels very different from a SNES one.
Let’s level up your setup with per-emulator mapping in RetroArch.
RetroArch, the powerful backend for RetroPie, allows you to save unique button maps for each emulation “core.”
This means your controller can automatically switch its layout when you jump from a Nintendo 64 game to a PlayStation classic.
It’s the key to an authentic retro feel.
Ready to customize?
The process is straightforward once you know where to look.
Follow these steps to create a custom map for any emulator on your Raspberry Pi.
- Launch any game from the system you want to configure (e.g., load a SNES title).
- Once in-game, open the RetroArch Quick Menu. The default hotkey is typically Select + X or HotKey + X.
- Navigate down to the Controls menu and select it.
- Choose Port 1 Controls. Here you can change each button’s function specifically for this core.
- After mapping the controls to your liking, go back to the previous menu.
- Select Save Core Remap File. This saves your custom layout and applies it to every game that uses this emulator core.
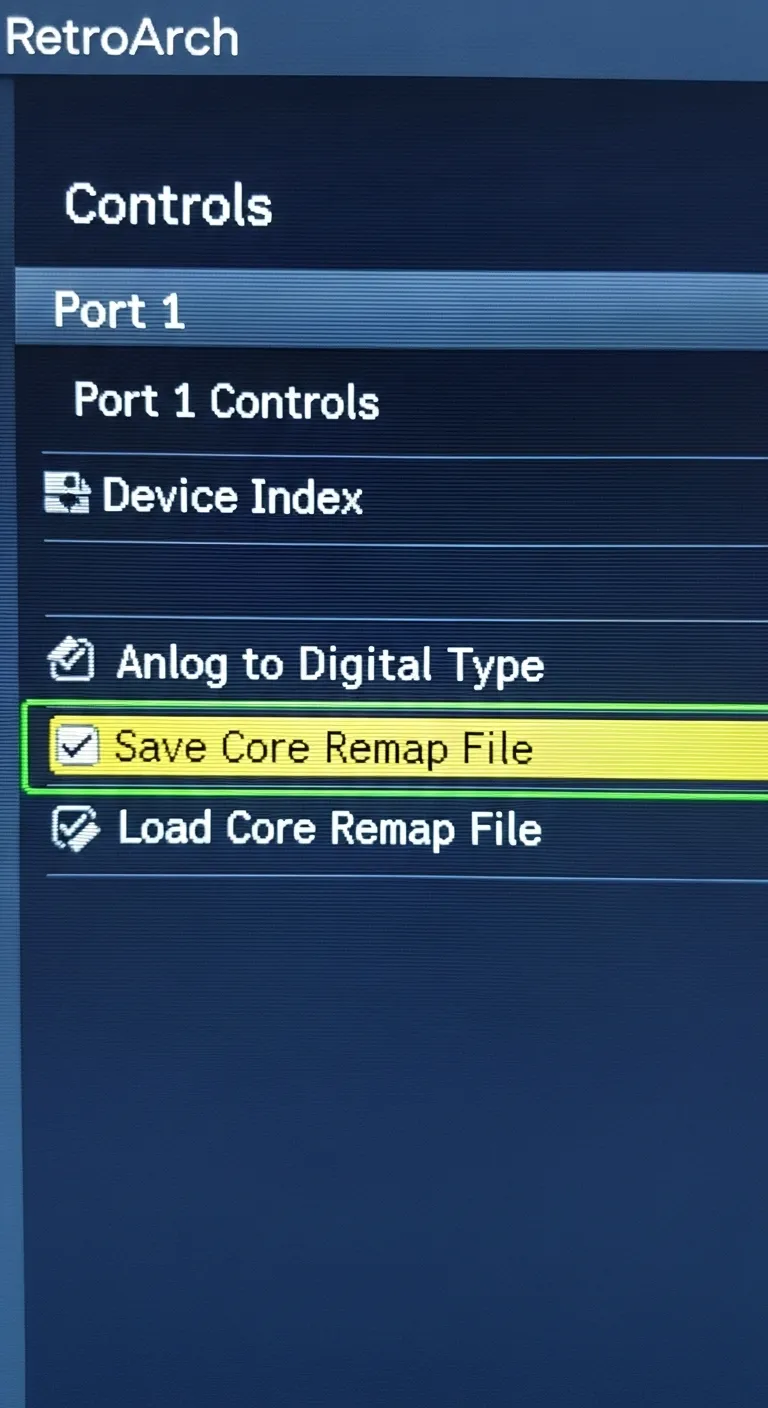
Once saved, exit the game and relaunch it to ensure your new settings are active.
This method gives you total control over your gaming experience, system by system.
“Core Input Remapping differs from standard input remapping, as it is loaded on a per-core basis, and it is not dependent on the input device being used.”– The Libretro Team, RetroArch Documentation
If your controls still feel unresponsive or erratic after remapping, the issue might be with the hardware itself.
Before spending hours fine-tuning software, run a quick Gamepad Drift Test to rule out any underlying analog stick problems.
RetroArch provides incredible flexibility within the emulation environment.
For those interested in system-level controller configuration on Raspberry Pi OS, exploring other top Linux gamepad mapping tools can offer even more advanced options outside of your retro games.
Fast Facts
- RetroArch allows you to create custom controller layouts for each individual emulator, known as ‘Core Remap Files’.
- This feature enables your controller to automatically switch its button mapping to match the original layout of the console being emulated (e.g., SNES vs. Sega Genesis).
- To create a custom map, launch a game, open the RetroArch Quick Menu, go to ‘Controls’, reconfigure the buttons, and then select ‘Save Core Remap File’.
Essential Hotkeys: Mastering In-Game Functions (Save/Load, Exit)
Once your gamepad is configured, mastering hotkeys is the next step.
These are special button combinations that let you control the emulator itself, not just the game.
Think of them as shortcuts for essential actions like saving your progress.
The most important button is your “Hotkey Enable” button.
You assigned this during the initial setup, and it’s often the ‘Select’ or ‘Home’ button.
By holding this down, you activate the special functions of other buttons on your joypad.
“The Hotkey button is what activates hotkey combinations. When the hotkey button is held down, other button presses are no longer sent to the game.”– The RetroPie Project, RetroArch Configuration Wiki
Learning these combinations is crucial for a smooth retro gaming session.
You can save your game right before a tough boss or exit back to the menu without needing a keyboard.
Let’s level up your controller knowledge with the defaults!
Default RetroPie Hotkeys
Here are the most common and useful hotkeys to get you started. Remember to hold your designated ‘Hotkey’ button first, then press the second button.
- Hotkey + Start: Exit the current game and return to the menu.
- Hotkey + Right Shoulder (R1): Save a state. This saves your exact position in the game.
- Hotkey + Left Shoulder (L1): Load the state you just saved.
- /Hotkey + X: Open the RetroArch Quick Menu for advanced options.
- Hotkey + Right/Left on D-Pad: Cycle through your save state slots.
- A designated ‘Hotkey Enable’ button must be held down to activate emulator functions, preventing accidental inputs during gameplay.
- Essential default hotkeys allow you to exit a game (Hotkey + Start), save your progress at any point (Hotkey + R1), and load that progress (Hotkey + L1).
- Mastering these button combinations is crucial for managing your game session, saving progress before difficult sections, and exiting games without a keyboard.
- Use a Wired Connection: A wired USB controller will almost always have less latency than a Bluetooth one.
- Enable TV “Game Mode”: This is critical. Most modern TVs have a “Game Mode” that turns off post-processing effects, significantly cutting down on display lag.
- Adjust RetroArch Settings: Explore options like “Run-Ahead” and “Frame Delay” in the Latency settings menu. These can be powerful but may require more processing power.
- To fix controller detection or button mapping issues, first check physical connections and power, then reconfigure controls in EmulationStation or RetroArch.
- Combat input lag by using a wired controller, enabling your TV’s ‘Game Mode’, and adjusting latency settings in RetroArch.
- Address analog stick drift by increasing the ‘deadzone’ in RetroArch’s settings to ignore minor, unintentional joystick movements.
- Raspberry Pi
- A versatile machine used as a retro gaming rig that can connect to most modern gamepads via USB or Bluetooth.
- Input Lag
- The delay between a physical action on a controller and the corresponding action occurring in the game. The text notes that a low input lag is crucial for retro gaming.
- USB
- A wired connection method for gamepads described as a simple, plug-and-play experience that provides the lowest possible input lag.
- Bluetooth
- A wireless connection method for gamepads that offers freedom of movement but requires a pairing process and may introduce slightly higher latency.
- Pairing Mode
- A specific state a Bluetooth controller must be put into in order for a device like a Raspberry Pi to discover and connect with it.
Advanced users looking for deeper customization can explore different mapping software.
There are many top Linux gamepad mapping tools that offer granular control over every button and axis, as Raspberry Pi OS is a Linux-based system.
Practice these combos, and you’ll navigate your retro library like a pro. No more getting stuck or losing progress on those classic, challenging titles!
Fast Facts
Troubleshooting Common Issues: From Detection to Input Lag
Even the best retro gaming setup can hit a snag.
If your gamepad isn’t behaving as expected, don’t worry.
Let’s work through the most common problems and get you back to enjoying your favorite classics on the Raspberry Pi.
Controller Not Detected at All
First, check the basics.
If you’re using a wired controller, ensure the USB cable is securely plugged into both the controller and the Pi.
Try a different USB port.
For wireless controllers, confirm it’s fully charged and properly paired via Bluetooth.
A weak power supply can also prevent the Raspberry Pi from properly powering connected USB devices.
Ensure you are using an official or high-quality power adapter.
This simple fix often solves detection mysteries.
Incorrect or “Ghost” Button Inputs
Sometimes your controller is detected, but the buttons are all wrong.
Your ‘jump’ button might be ‘pause.’
This usually means the initial configuration needs a reset.
You can re-run the controller setup from EmulationStation’s main menu.
For more specific issues inside a game, you’ll need to dive into RetroArch.
You can remap controls globally or create custom mappings for specific emulators (cores).
This ensures your D-pad works perfectly for a platformer and your analog stick is tuned for a racing game.
Battling Input Lag and Latency
Input lag is the frustrating delay between pressing a button and seeing the action on screen.
It can make fast-paced retro games unplayable.
Fortunately, you have several tools at your disposal to fight back against latency.
Here are the most effective ways to reduce input lag:
Before tweaking settings, it’s a good idea to test your controller’s latency to get a baseline measurement.
This helps you see if your changes are making a real difference.
“For modern HDTVs, the most important step in reducing lag is to enable ‘Game Mode’ (or whatever your set calls it). This bypasses much of the TV’s internal video processing…”– Kyle Orland, Ars Technica
Fixing Analog Stick Drift
Is your character moving on their own?
You might be experiencing stick drift.
This happens when the analog stick sends an input signal even when it’s in a neutral position.
It’s often a hardware issue, but software can help compensate.
You can adjust the “deadzone” setting in RetroArch’s input menu.
Increasing the deadzone tells the emulator to ignore small, unintentional movements from the stick’s center.
This is a great way to manage minor drift without replacing your controller.
If you suspect a hardware problem, you can confirm it with our Gamepad Drift Test.
Understanding the cause can also help you choose controllers with joysticks less prone to wear, which can help prevent stick drift in the future.
Fast Facts
Conclusion
You’ve successfully leveled up your controller knowledge! You now know how to connect any USB or Bluetooth gamepad to your Raspberry Pi.
There’s nothing standing between you and your favorite classic titles. It’s time to stop tinkering and start playing. Let’s get you back in the game!
Frequently Asked Questions
What’s better for retro gaming: USB or Bluetooth?
USB offers the lowest input lag, which is perfect for precision gameplay. Bluetooth gives you the freedom to play from your couch. It’s your call!
My Bluetooth controller won’t connect. What should I do?
First, ensure it’s fully charged and in pairing mode. Try removing it from your Pi’s Bluetooth devices and re-pairing it. A quick reboot can help too.
Can I use an Xbox or PlayStation controller?
Absolutely! Most modern gamepads, including those from Xbox and PlayStation, work great. Just follow the USB or Bluetooth steps to get set up.
Do I need to configure the controller for every single game?
Nope! Your retro gaming software saves your main button layout. You will only need to make tweaks for specific emulators or games if you want to.


