Table of Contents
Is your character walking off cliffs without you touching the stick?
Joy-Con drift is frustrating, but don’t panic! You don’t need to buy a new pair just yet.
I’m here to walk you through the ultimate DIY fix to stop that drift dead in its tracks.
We’ll crack open that shell and swap the parts safely.
Grab your screwdriver, and let’s level up your controller knowledge to get you back in the game!
TL;DR
- Troubleshoot first by using the system calibration tool and applying electrical contact cleaner to clear potential debris.
- Nintendo offers free official repair programs for drifting Joy-Cons in North America, Europe, and Latin America.
- For a permanent fix, upgrade standard potentiometer sticks to magnetic Hall Effect modules to eliminate physical wear.
Troubleshooting Basics: Calibration, Contact Cleaner, and Official Repairs
Before grabbing your screwdriver set, we should rule out software glitches and minor debris. Often, what looks like mechanical failure is just dust.
Start by testing your controller with our online Gamepad Drift Test tool. This visualizes the jitter and confirms which axis is acting up.
Step 1: System Calibration
The Nintendo Switch has a built-in recalibration tool that resets the center point of your analog sticks. This is your first line of defense.
Navigate to System Settings on your console menu. Scroll down and select Controllers and Sensors, then choose Calibrate Control Sticks.
Follow the on-screen prompts precisely. Tilt the stick as directed and release. If the crosshair turns to a plus sign, the software has corrected the error.
Step 2: The Contact Cleaner Method
If calibration fails, dirt or graphite dust might be interfering with the sensors. You can clean this without opening the shell.
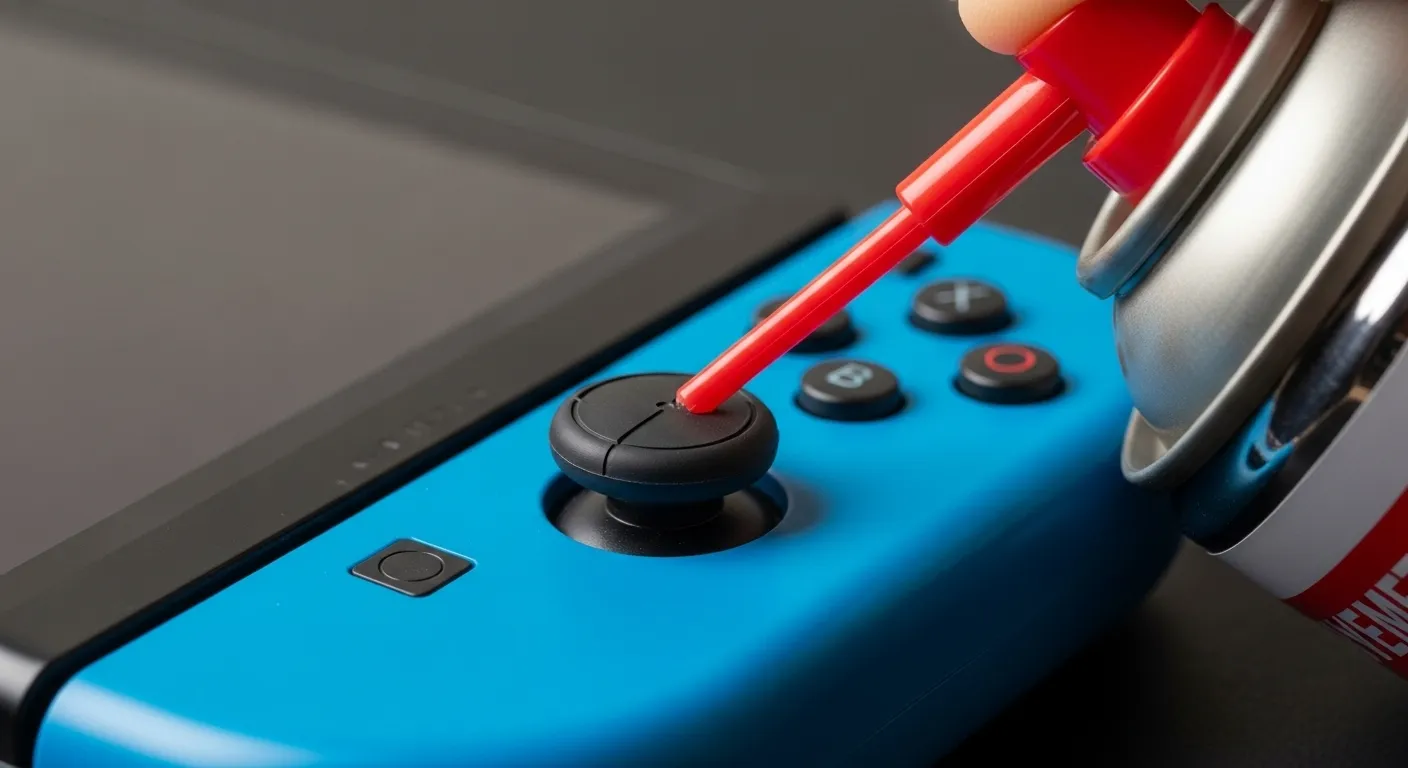
You need specific Electrical Contact Cleaner (like WD-40 Specialist Contact Cleaner). Do not use standard WD-40 or oil, as these ruin electronics.
- Lift the thin rubber skirt under the joystick cap using a toothpick.
- Spray a very short burst of cleaner into the gap.
- Rotate the stick in circles for 30 seconds to distribute the fluid.
- Allow the controller to dry for 5 minutes before testing again.
“The issue is that the contact patch on the sliders wears down over time, depositing conductive debris on the sensor tracks.”– Kevin Purdy, iFixit Joy-Con Teardown Analysis
Step 3: Official Repair Programs
If the chemical fix does not work, the sensor tracks are likely physically damaged. This is a common flaw in potentiometer-based sticks.
For a deeper dive into why this technology fails compared to modern alternatives, check our guide on Hall Effect vs Potentiometer Joysticks.
Nintendo currently offers free repair for drifting Joy-Cons in North America, Latin America, and Europe, even out of warranty. Visit their official support site for details.
A pie chart showing that 40% of classic Nintendo Switch owners reported experiencing Joy-Con drift issues.
If you are ineligible for free repair or prefer a hands-on approach, proceed to the next section for the full hardware replacement guide.
Fast Facts
- Begin troubleshooting by utilizing the built-in calibration tool found in the Nintendo Switch System Settings to reset the analog stick’s center point.
- If calibration fails, attempt to clean the sensor by spraying specific electrical contact cleaner under the joystick’s rubber skirt and rotating the stick.
- For persistent drift caused by physical wear, Nintendo offers free repair programs in North America, Latin America, and Europe.
The Permanent Fix: Why Upgrade to Hall Effect Joystick Modules
If you have tried cleaning your Joy-Cons and the drift keeps coming back, you are not alone. The issue lies in the design of the original components.
Standard joysticks use potentiometers. These rely on physical wipers moving across carbon tracks to read your inputs. Over time, friction wins.
The tracks wear down and create conductive dust. This confuses the sensors and causes the cursor to move on its own. It is a hardware inevitability.
Fast Facts
- Stick drift is a hardware inevitability in standard joysticks due to the design of potentiometers, which rely on physical wipers moving across carbon tracks.
- Friction causes these tracks to wear down and create conductive dust, which confuses sensors and results in cursor movement without input.
- Upgrading to Hall Effect Joystick Modules offers a permanent fix to the inherent wear and tear issues found in the original component design.
The Permanent Solution: Hall Effect
The upgrade involves swapping the stock parts for Hall Effect joystick modules. These use magnets to detect position changes through magnetic fields.
Because the internal parts never touch, there is no friction. No friction means no wear, and most importantly, no drifting over time.
This technology offers a significant leap in longevity. For a deeper dive into the mechanics, read our guide on how joystick controllers work.
A bar chart comparing the rated lifespan of standard potentiometers (2 million cycles) versus Hall Effect sensors (10 million+ cycles).
Fast Facts
- Hall Effect modules eliminate stick drift and physical wear by using magnetic fields to detect movement without internal friction.
- The technology offers significantly greater durability, rated for over 10 million cycles compared to the 2 million cycles of standard potentiometers.
Comparison: Stock vs. Upgrade
Before you tear down your controller, it helps to see exactly what you are gaining with this DIY repair.
| Feature | Standard Joy-Con Stick | Hall Effect Upgrade |
|---|---|---|
| Drift Risk | ❌ High (Inevitable) | ✅ Extremely Low |
| Contact Mechanism | ❌ Physical Contact | ✅ Magnetic (Contactless) |
| Precision | ❌ Degrades over time | ✅ Consistent Accuracy |
| Wear & Tear | ❌ Friction creates dust | ✅ No internal wear |
This upgrade is widely considered the best preventative measure for drift. It fixes the root cause rather than just treating the symptoms.
“Hall effect sensors rely on magnets and electrical conductors… they don’t rely on physical contact, so they don’t wear out.”– Cameron Faulkner, The Verge
If you are unsure whether your current stick is failing or just dirty, check out our comparison of Hall Effect vs potentiometer joysticks.
Ready to start the repair? These modules are affordable and fit directly into the Joy-Con housing without soldering.
In the next steps, we will gather the necessary tools to perform this surgery safely. It is easier than it sounds.
Fast Facts
- Hall Effect upgrades solve the root cause of stick drift and internal wear by using magnetic, contactless sensors instead of physical mechanisms that degrade over time.
- Compared to standard sticks, the upgrade offers consistent precision and eliminates friction-induced dust, ensuring long-term reliability.
- The repair process is accessible, as the modules are affordable and install directly into the Joy-Con housing without the need for soldering.
Required Tools: Tri-wing Screwdrivers and Replacement Parts
Before attempting any repairs, you must gather the correct equipment. Using improper tools on a Nintendo Joy-Con is a guaranteed way to cause permanent damage.
The most critical tool is the Y00 Tri-wing screwdriver. Nintendo uses proprietary three-pronged screws on the outer shell to discourage tampering.
Do not attempt to use a small flathead or a different size driver. The screws are made of soft metal and will strip instantly if you are not precise.
Once you get past the outer shell, the internal components are held down by standard screws. You will need a PH00 Phillips screwdriver for these.
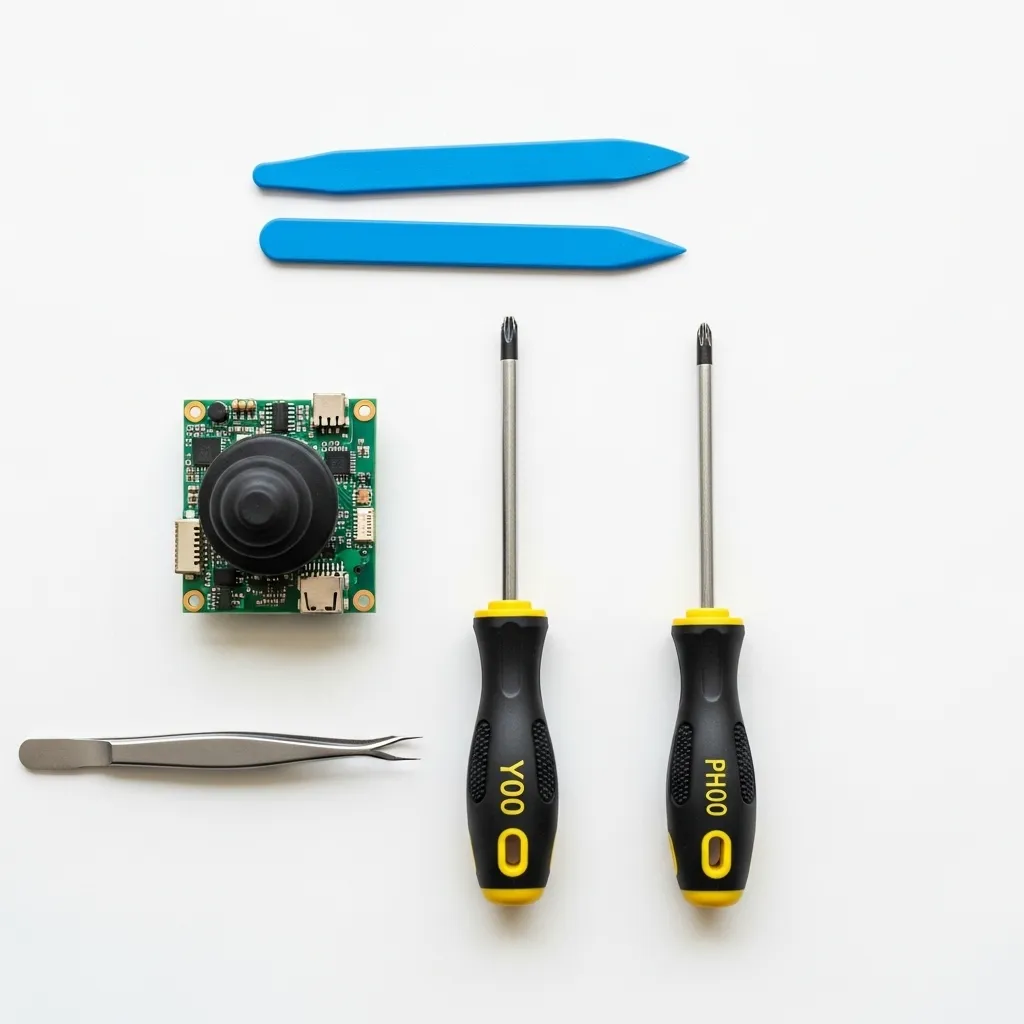
Opening the plastic casing requires finesse. A plastic spudger or a guitar pick is essential to pop the clips without gouging the plastic shell.
Inside the controller, you will encounter tiny ribbon cables. These transmit data for the buttons and the stick. They are extremely fragile.
A pair of angled tweezers is vital for handling these cables. You will need them to flip up the delicate locking tabs on the ZIF connectors.
Before you order replacement parts, confirm the severity of the issue. Use the Gamepad Drift Test to visualize exactly how your analog stick is failing.
For the replacement part itself, you have two main options. You can buy an OEM-style potentiometer stick, which is identical to the original.
However, the modern standard is the Hall Effect joystick. To understand why this is better, it helps to know how joystick controllers work internally.
Hall Effect sensors use magnets rather than physical contact pads. This means they do not wear out over time, effectively curing drift forever.
“The screws on the Joy-Con are incredibly soft. If you don’t apply enough downward pressure, you will strip them. Make sure you have a high-quality Y00 driver.”– Whitson Gordon, iFixit Repair Guide
Essential Toolkit Checklist
Ensure you have every item on this list before you remove a single screw. Missing one tool can leave your controller in pieces.
| Tool Name | Specific Size/Type | Primary Purpose |
|---|---|---|
| Tri-wing Driver | Y00 (1.5mm) | Removing the 4 outer shell screws. |
| Phillips Driver | PH00 (1.5mm) | Removing internal battery and bracket screws. |
| Prying Tool | Plastic Spudger | Separating the controller housing safely. |
| Tweezers | Angled, Anti-static | Manipulating ribbon cables and connectors. |
| Replacement Stick | Hall Effect (Recommended) | Replacing the defective sensor module. |
If you are buying a repair kit online, check the reviews for the screwdriver quality. Cheap kits often include soft drivers that deform easily.
Magnetic tips are a huge plus. The internal screws are incredibly small, and dropping one into the carpet usually means it is gone forever.
Fast Facts
- Repairing a Nintendo Joy-Con requires specific tools, most notably a Y00 Tri-wing screwdriver for the soft outer screws and a PH00 Phillips driver for internal components, to avoid stripping screws or damaging the shell.
- Hall Effect joysticks are the recommended replacement part because they utilize magnets instead of physical contact pads, preventing wear and effectively eliminating stick drift permanently.
Step-by-Step DIY Guide: Installing Hall Effect Sensors
Upgrading your Joy-Cons with Hall Effect sensors is the permanent solution to stick drift. These sensors use magnets instead of physical contacts.
This means the components do not degrade over time like traditional carbon film potentiometers. It stops drift at the source.
Before we begin, ensure you have a Y00 tri-wing screwdriver, a PH00 Phillips screwdriver, and plastic tweezers. Let’s get to work.
A bar chart comparing joystick durability: Standard Potentiometers last roughly 2 million cycles, while Hall Effect Sensors last over 10 million cycles.
1. Open the Joy-Con Housing
Use your Y00 screwdriver to remove the four screws on the back of the controller. Keep these screws safe. Be careful, as the heads strip easily.
Gently run a spudger along the seam to separate the two halves. Open it carefully like a book to avoid straining the ribbon cables.
2. Remove the Battery and Midframe
Use a plastic tool to gently pry the battery connector up from the motherboard. Set the battery aside to prevent any short circuits.
Remove the gold or silver Phillips screws holding the plastic battery tray (midframe) in place. Lift the tray out carefully.
Note: Be extremely careful with the ZL/ZR ribbon cables attached to the midframe. They are fragile and easy to tear.
3. Swap the Joystick Module
Locate the joystick box. Use tweezers to flip up the locking flap on the ribbon cable connector. Slide the cable out gently.
Remove the two Phillips screws securing the joystick housing. Pull the old stick out and insert your new Hall Effect module.
Secure it with the screws and reconnect the ribbon cable. Ensure the flap is locked down firmly to establish a good connection.
“Because there is no physical contact between moving parts, the sensor doesn’t wear out… It’s a permanent solution to joystick drift.”– Dave McQuilling, What Is a Hall Effect Joystick?
4. Reassembly and Calibration
Reassembling the Joy-Con involves reversing the disassembly steps. It is vital to align the battery tray correctly and ensure no cables are pinched. After the shell is secured, software calibration is required to center the new Hall Effect sensors. The section below covers this in detail.
If the stick appears off-center initially, do not panic. Follow the on-screen prompts to teach the Switch the new center point.
Once calibrated, verify the performance using our online Gamepad Controller Test to ensure full range of motion.
If you notice other inputs acting up after reassembly, you might need to check our guide on how to fix sticky controller buttons without taking it apart.
Final Steps: Reassembly and Calibrating the New Sticks
You have successfully swapped the component. Now it is time to close up the controller. Reassembly is straightforward if you move slowly and carefully.
- Reconnect the battery connector gently using plastic tweezers.
- Ensure the battery sits flat in its tray without pinching wires.
- Align the antenna plate correctly if you are repairing the right Joy-Con.
- Fold the shell halves together like a book to avoid straining cables.
- Tighten the four Y-screws on the back, but do not overtighten.
The physical work is done. However, the software does not know you installed a new stick yet. The electrical center point might be slightly off.
“If the control sticks on the Joy-Con controllers are not responding correctly, please calibrate them.”– Nintendo Support, How to Calibrate the Controllers
To calibrate, turn on your Switch. Go to System Settings and scroll down to Controllers and Sensors. Select Calibrate Control Sticks to begin.
Press down on the stick you just replaced. Follow the on-screen prompts to rotate the stick. This teaches the system the new center and range.
Once calibrated, you need to verify the repair. Use the Gamepad Controller Test to check all buttons and axes.
It is also wise to ensure you reconnected the rumble motor correctly. Run a quick check on the Gamepad Controller Vibration Test page.
By fixing this yourself, you have saved a significant amount of money. Here is a quick breakdown of the value you just gained.
A bar chart comparing the low cost of a DIY repair kit ($15) versus buying a single Joy-Con ($40) or a new pair ($80).
Your controller should now feel crisp and responsive. Enjoy drift-free gaming and the satisfaction of a job well done.
Fast Facts
- Hall Effect sensors offer a permanent solution to joystick drift by utilizing magnets instead of physical contacts, resulting in components that do not degrade over time.
- The installation process requires specific tools like Y00 and PH00 screwdrivers and involves carefully disassembling the Joy-Con to swap the module without damaging fragile ribbon cables.
- After physical installation, calibrating the new sticks within the Nintendo Switch System Settings is a crucial step to ensure proper centering and functionality.
Ready for Drift-Free Gaming?
You’ve now got the tools to tackle Joy-Con drift head-on. Whether you calibrated, cleaned, or swapped parts, you are in control.
If the quick fixes didn’t stick, upgrading to Hall Effect joysticks is the ultimate solution. It is a total game-changer for longevity.
Don’t let a wandering analog stick ruin your high score. Grab your tools, follow the steps, and let’s get you back in the game!
Frequently Asked Questions
Does opening my Joy-Con void the warranty?
Yes, opening the shell usually voids the warranty. If your warranty is active, contact Nintendo Support for a free repair first.
What is the permanent fix for stick drift?
Installing Hall Effect joystick modules is the best long-term fix. They use magnets, so there is no physical wear on the sensor tracks.
Can I use regular WD-40 on my controller?
No! Never use standard WD-40. It leaves an oily residue that ruins electronics. Only use specialized Electrical Contact Cleaner.
Is the DIY repair difficult for beginners?
It is manageable! You just need patience and the right Y00 screwdriver. Follow our guide step-by-step to fix it safely.
Technical Glossary
- System Calibration
- A built-in software process located in the System Settings that resets the center point of analog sticks to correct positioning errors.
- Electrical Contact Cleaner
- A specialized fluid designed to remove dirt, graphite dust, and oxidation from electronic components without damaging them, distinct from standard oils.
- Sensor Tracks
- The conductive paths within a joystick mechanism that detect movement, which can fail if physically damaged or obstructed by debris.
- Potentiometer
- The standard technology used in Joy-Con sticks that relies on physical wipers moving against resistive tracks, making them prone to wear and drift.
- Hall Effect
- A modern joystick technology referenced as an alternative to potentiometers, noted for its immunity to the physical wear common in standard controllers.


