Is your Xbox Series X|S D-pad’s clicking driving you crazy? Whether it’s too loud, feels mushy, or isn’t responding right, you’re in the right place!
This guide will walk you through a simple fix to get those clicks feeling crisp and consistent again. No more missed inputs or distracting noises.
Let’s level up your controller knowledge and get you back in the game with a D-pad that performs flawlessly!
TL;DR
- The audible click of the Xbox Series X|S D-pad is an intentional design feature for tactile feedback, originating from its metal dome switch.
- Issues like overly loud, inconsistent, or mushy D-pad clicks are often caused by debris, wear and tear, or manufacturing variations rather than a critical failure.
- Before attempting a repair, it’s crucial to diagnose whether the problem is purely mechanical (sound/feel) or functional (unregistered inputs) using a gamepad tester.
- A thorough diagnosis involves both digital input tests and physical/auditory checks to pinpoint the exact cause of the D-pad clicking anomaly.
Unraveling the Xbox Series X|S D-Pad Clicking Enigma
The Xbox Series X|S controller D-pad is famous for its satisfying, audible click. Microsoft designed it this way for crisp, tactile feedback. But when that sound becomes inconsistent or overly loud, it can be a real distraction.
This “enigma” stems from its unique hybrid design. It merges a traditional cross with the faceted, circular shape from the Xbox Elite controller. This change aims to give you better precision for diagonal inputs in fighting games and platformers.

The sound itself comes from a small metal dome switch beneath the pad. When you press a direction, the dome collapses and pops back, creating the click. So, is your controller broken? Not necessarily. Here are the common culprits.
What Causes the D-Pad Clicking Noise?
Understanding the design is key to diagnosing the sound. The new D-pad is a significant departure from the older, quieter membrane-based design of the Xbox One controller. Let’s level up your knowledge on the key differences.
- Mechanical Design: The primary source is the metal dome switch, which is inherently noisy but provides excellent tactile response.
- Wear and Tear: Over thousands of presses, the contact points can wear, potentially altering the sound. It might become louder or feel less crisp.
- Debris or Residue: Dust, crumbs, or dried liquids can get lodged in the mechanism. This can cause a “crunchy” sound or an inconsistent click. This is similar to issues that can make other inputs feel off, like when you need to fix sticky controller buttons.
- Manufacturing Variations: Some controllers are simply louder than others right out of the box due to tiny differences in production.
“We found that the D-pad is used in a wide variety of ways by a wide variety of gamers. For some games, it’s the primary way of interacting… For other games, it’s a set of four extra buttons. We wanted to make sure we were improving the performance for all those use cases.”– Ryan Whitaker, Senior Designer at Xbox, Xbox Wire
Many gamers choose to tackle these issues themselves. A 2021 report from the PIRG Education Fund found that 45% of people surveyed attempted to repair a broken electronic device.
The desire to fix our own gear is strong in the gaming community.
A pie chart showing how gamers handle broken accessories: 45% attempt a DIY repair, 25% seek professional repair, and 30% replace the item immediately.
Before you grab your tools, it’s vital to confirm if the D-pad is just noisy or actually malfunctioning. A quick check with our Gamepad Controller Test will show if all your inputs are registering correctly.
If they are, the issue is likely purely mechanical or cosmetic.
Fast Facts
- The Xbox Series X|S D-pad’s audible click is an intentional design feature, stemming from a metal dome switch, engineered for crisp, tactile feedback and improved precision for diagonal inputs.
- Variations in the D-pad’s clicking sound (inconsistency or excessive loudness) are often caused by factors like normal wear and tear, debris accumulation, or manufacturing variations, rather than a fundamental malfunction.
- Before attempting repairs, it’s crucial to distinguish between a merely noisy D-pad and one that is actually malfunctioning, as the sound itself is a core part of its mechanical design.
Advanced Diagnostics: Pinpointing the Root Cause of Your D-Pad’s Click
Before you reach for a screwdriver, let’s pinpoint the exact problem.
A proper diagnosis is key to a successful repair and can save you a lot of hassle.
Let’s get to the bottom of that faulty D-pad click.
First, give your controller a digital checkup. A software test can reveal issues that your fingers might miss, like intermittent failures or ghost inputs.
This helps confirm if the problem is truly hardware-based.
We highly recommend using our main Gamepad Controller Test to get a clear visual of your D-pad’s performance.
Press each direction firmly and observe the on-screen feedback. Is every press registering correctly and without delay?
Physical and Auditory Checks
With the digital test complete, let’s use our senses. Pay close attention to the physical feel and sound of the D-pad.
These clues are vital for understanding what’s happening inside the controller’s shell.
- Listen Carefully: Does the click sound sharp and distinct in all four directions? A muted, mushy, or inconsistent sound points to an internal issue.
- Feel the Difference: Press up, down, left, and right. Does one direction feel softer or require more force than the others? This suggests uneven wear on the components.
- Check for Debris: Visually inspect the crevices around the D-pad. Sometimes, dirt and grime can get lodged, physically obstructing the mechanism. This is often the cause for button issues, similar to how you would fix sticky controller buttons.
The unusual click in the Xbox Series X|S D-pad is typically caused by one of two components: the conductive rubber membrane or the underlying metal dome switch that creates the “click” sound and registers the input.
“Underneath that clever new D-pad, we find a standard dome switch for each of the four directions.”– iFixit
By identifying the specific symptoms, you can make an educated guess about which part is failing before you even open the controller.
Use the table below to help narrow down the cause.
| Symptom | Likely Cause: Rubber Membrane | Likely Cause: Dome Switch |
|---|---|---|
| Mushy or unresponsive feel | ✅ Worn, dirty, or torn | ❌ Less likely |
| Loud, metallic, or inconsistent click | ❌ Less likely | ✅ Damaged, bent, or misaligned |
| Direction works intermittently | ✅ Debris underneath | ✅ Corroded or weakened |
| No input registers at all | ✅ Severely torn or misaligned | ✅ Completely damaged or corroded |
Identifying Specific Mechanical Failures: Worn Pivot, Friction, or Misalignment?
That annoying clicking from your D-pad isn’t just a sound. It’s a symptom of a specific mechanical issue under the hood.
Let’s pinpoint the culprit so you can get back to precise, silent inputs.
The innovative design of the Series X|S D-pad provides a satisfying tactile feel, but its complexity also introduces unique failure points.
Understanding these is the first step toward a successful repair.
Fast Facts
- Begin with a digital software test to confirm if D-pad issues are hardware-related and to visualize performance.
- Perform physical and auditory checks by listening for consistent clicks, feeling for even pressure, and inspecting for debris around the D-pad.
- Differentiate between a faulty rubber membrane (mushy, unresponsive feel) and a damaged metal dome switch (loud, inconsistent, or absent click) based on specific symptoms.
Common Causes of D-Pad Clicking
Most D-pad issues boil down to three main mechanical problems.
By isolating the cause, you can figure out the best way to fix it.
The noise you hear is often a result of unintended contact or movement.
- Worn Central Pivot: The D-pad rocks on a small, central pivot. Over time, this plastic component can wear down, creating extra space. This “wobble” causes the D-pad to click against the controller’s shell during presses.
- Friction from Debris: Dust, skin cells, and snack crumbs can work their way into the tight space around the D-pad. This buildup creates friction, leading to grinding or clicking sounds as the plastic rubs against the debris.
- Internal Misalignment: A hard drop or even a manufacturing imperfection can knock the D-pad or its underlying conductive membrane slightly out of place. This causes parts to collide incorrectly, producing a sharp click upon actuation.
“The D-pad is a single solid piece that rocks on a central pivot. From an engineering standpoint, this is a very simple and robust design…”– Kyle Pittman,
Game Developer
To diagnose your specific issue, listen carefully. Does the click happen on every directional press or only on one?
A consistent click suggests pivot wear, while an irregular one might point to debris.
Understanding how joystick controllers work can give you a better sense of these mechanical interactions.
Gently wiggle the D-pad with your thumb without pressing it down. Excessive looseness is a strong indicator of a worn-out pivot point.
If it feels gritty, debris is the likely cause. This initial hands-on test is your best diagnostic tool.
Fast Facts
- D-pad clicking commonly results from a worn central pivot, creating excess wobble and causing the D-pad to click against the controller’s shell.
- Accumulated debris like dust and crumbs can cause friction, leading to grinding or clicking sounds as the D-pad rubs against it.
- Internal misalignment of the D-pad or its underlying membrane, often due to drops or manufacturing defects, can cause parts to collide incorrectly and produce clicking sounds.
Targeted Repairs: Precision Solutions for Xbox Series X|S D-Pad Clicking
Ready to silence that distracting D-pad click?
A do-it-yourself repair is often the answer.
This issue typically comes from the metal dome switch beneath the D-pad, which can be adjusted with a bit of patience and the right tools.
WARNING: Opening your controller will likely void its warranty.
Proceed with caution, as you are responsible for any potential damage.
If you are not comfortable, consider professional repair services.
Essential Tools for the Repair
Before you start, gather these tools to make the process smooth and safe for your gamepad.
Having the right equipment prevents stripped screws and scratched plastic.
- T8 Security Torx screwdriver
- Plastic prying tool (a guitar pick or old credit card can work)
- Small piece of electrical or Kapton tape
- Isopropyl alcohol and a cotton swab
The D-Pad Repair Procedure
Follow these steps carefully to access and modify the D-pad mechanism. Take your time and keep track of all screws and small parts you remove.
- Disassembly: Begin by removing the controller’s side grips. They should pop off with gentle pressure from your prying tool. This will reveal the screws holding the shell together. Use your T8 screwdriver to remove them.
- Open the Shell: Carefully separate the front and back plates of the controller. Be mindful of any internal ribbon cables that might be connected between the two halves.
- Access the D-Pad: Once open, you’ll see the main circuit board. The D-pad mechanism is located on this board, underneath the rubber membrane. Lift the membrane to expose the small, circular metal dome switch.
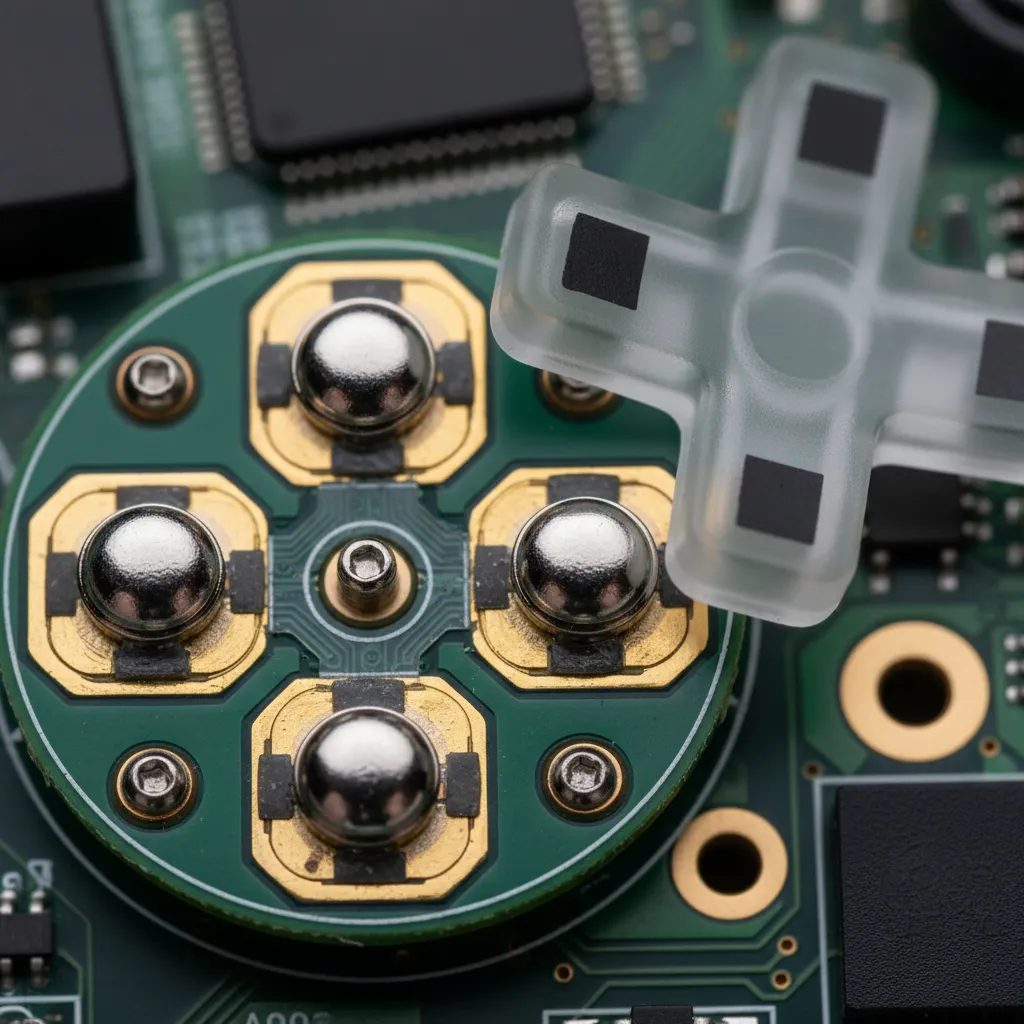
“We learned from the Elite controller and from watching people play, people want to play with the d-pad. It’s not just a menu-selection button anymore… The new dish gives your thumb a nice little home to sit in.”– Ryan Whitaker, VentureBeat
- Apply the Fix: First, gently clean the dome and the contact point on the board with a cotton swab and isopropyl alcohol. For the primary fix, cut a tiny square of electrical tape, just large enough to cover the metal dome. Place it directly on top of the dome. This acts as a dampener, reducing the loud clicking sound without affecting functionality.
- Reassembly: Carefully put the controller back together in the reverse order you took it apart. Ensure the rubber membrane is seated correctly and that no wires are pinched before closing the shell and replacing the screws.
Post-Repair Testing and Verification
After reassembling your controller, it’s crucial to test everything.
Make sure every D-pad direction registers correctly and that the clicking sound is reduced.
While you’re at it, give your analog sticks a check-up with our Gamepad Drift Test to ensure they weren’t affected during the repair.
Let’s get you back in the game!
Beyond Basic: Micro-Lubrication, Structural Tweaks & Component Refinement
If cleaning the D-pad contacts didn’t resolve the loud clicking, it’s time to level up your repair skills.
These advanced methods involve careful disassembly and modification.
Proceed with caution, as these steps can void your warranty.
Applying Micro-Lubrication
The clicking noise often comes from plastic-on-plastic friction at the D-pad’s pivot point.
A tiny amount of the right lubricant can solve this.
It is crucial to use a lubricant that is safe for plastics and electronics.
- Select the Right Lubricant: Use a plastic-safe dielectric grease or a specific electronic component lubricant. Avoid WD-40 or petroleum-based oils, which can degrade the controller’s plastic over time.
- Disassemble the Controller: Carefully open your Xbox controller to access the D-pad assembly. Keep track of all screws and small parts.
- Apply Sparingly: Using a toothpick or a very fine brush, apply a minuscule amount of lubricant to the central pivot ball of the D-pad. You can also add a tiny dab where the D-pad makes contact with the shell.
- Reassemble and Test: Put the controller back together and test the D-pad’s feel and function. The goal is a smoother, quieter action without a mushy or unresponsive feeling.
Understanding how different parts of your controller function, like the joysticks, can give you more confidence when working on its internals.
You can learn more about the basics of how joystick controllers work for a broader perspective.
“It’s got to have that perfect little click… It’s about being an extension of your mind and body. It’s a very emotional connection.”– Carl Ledbetter, The Complete, Untold History Of The Xbox
Structural Damping for Sound Absorption
Another effective technique is to add a small amount of damping material.
This cushions the impact of the D-pad against the controller’s shell, absorbing the sound energy that causes the loud click.
This is a reversible mod.
Consider placing a tiny piece of material on the circuit board’s contact points for the D-pad. Good options include:
- A small square of thin felt tape.
- A piece of thin foam from electronics packaging.
- A precisely cut piece of electrical tape.
The key is to use material thin enough to dampen the sound without interfering with the electrical contact needed to register a button press.
After applying, be sure to test every direction on the D-pad to ensure full functionality.
Fast Facts
- The distracting D-pad clicking on Xbox Series X|S controllers is typically caused by the metal dome switch and can often be resolved with a DIY repair.
- The primary fix involves disassembling the controller, gently cleaning the metal dome switch, and applying a small piece of electrical or Kapton tape to dampen the sound.
- This repair requires specific tools (T8 Security Torx screwdriver, prying tool) and careful execution, as opening the controller will likely void its warranty.
Level Up Your Controller’s Clicks
That loud D-pad click is often a feature, not a flaw! It’s designed for that crisp, tactile feedback we gamers love.
Now you know the common culprits, from pesky debris to simple wear and tear. You’re equipped to diagnose the problem like a pro.
With these fixes, you can silence distracting noises and get back in the game with a controller that feels brand new. Happy gaming!
Frequently Asked Questions
Is the loud click from my Xbox D-pad normal?
Yes, it’s completely normal! The Series X|S controller uses a mechanical dome switch for a distinct, tactile click with each press.
A change in the sound, however, might point to debris or wear.
Can I fix a crunchy D-pad without opening the controller?
Absolutely. Start with the basics. A can of compressed air blown around the D-pad’s edges can dislodge dust and crumbs easily.
For stickiness, a cotton swab with a bit of isopropyl alcohol works wonders.
Will opening my controller void my warranty?
Yes, breaking the factory seal by opening the controller will almost certainly void your warranty with Microsoft.
Always try non-invasive cleaning methods first or contact support if you’re still covered.
Why is this D-pad so different from the Xbox One controller?
It’s a hybrid design inspired by the premium Xbox Elite controller. It blends a classic cross with a faceted disc for better precision.
This design uses a mechanical switch, unlike the older, quieter membrane style.
Technical Glossary
- D-pad
- A directional pad on a game controller used for movement and other inputs. The Xbox Series X|S controller features a hybrid design that combines a traditional cross shape with a faceted, circular shape.
- Hybrid Design
- In the context of the controller, a design that merges a traditional cross-shaped D-pad with the faceted, circular shape from the Xbox Elite controller to improve precision for diagonal inputs.
- Metal Dome Switch
- The mechanical component beneath the D-pad that creates the audible click and tactile feedback. When a direction is pressed, the dome collapses and pops back to create the sensation.
- Tactile Feedback
- A physical response, such as a click or vibration, felt by the user when interacting with a device. The Xbox Series X|S D-pad is designed to provide crisp tactile feedback.
- Membrane-Based Design
- An older, quieter D-pad design, such as the one used in the Xbox One controller, which uses a soft membrane layer to register presses, resulting in less audible and tactile response compared to a mechanical switch.


