Table of Contents
- Diagnostic Check: Distinguishing True Drift from ‘No Deadzone’ Mode and Interference
- Performing the Standard On-Controller Calibration Sequence
- Utilizing the KeyLinker App to Visualize and Adjust Deadzones
- Solving Persistent Calibration Errors via Firmware and CPU Updates
- Conclusion
- Frequently Asked Questions
Dealing with stick drift on your Gulikit KingKong 2 Pro? Even these Hall Effect beasts need a reset sometimes!
Don’t panic; I’ve got the fix.
We’ll bypass the frustration with a simple calibration trick to sort out your aim instantly.
No complicated software, just pure performance. Let’s level up your controller knowledge and get you back in the game fast!
TL;DR
- Distinguish ‘No Deadzone’ mode jitter and wireless interference from actual hardware drift.
- Perform the hardware calibration reset by holding L, R, D-pad Left, and A simultaneously.
- Place the controller on a flat, stable surface during the calibration vibration sequence.
- Hall Effect sensors require magnetic realignment rather than physical cleaning to fix drift.
Diagnostic Check: Distinguishing True Drift from ‘No Deadzone’ Mode and Interference
Before you attempt a hard reset or firmware update, we need to play detective. Not all unwanted movement is a hardware failure.
The Gulikit KingKong 2 Pro uses advanced sensors. Sometimes, what looks like drift is actually the controller doing exactly what it was told to do.
Let’s distinguish between actual defects, sensitivity settings, and wireless interference to save you time.
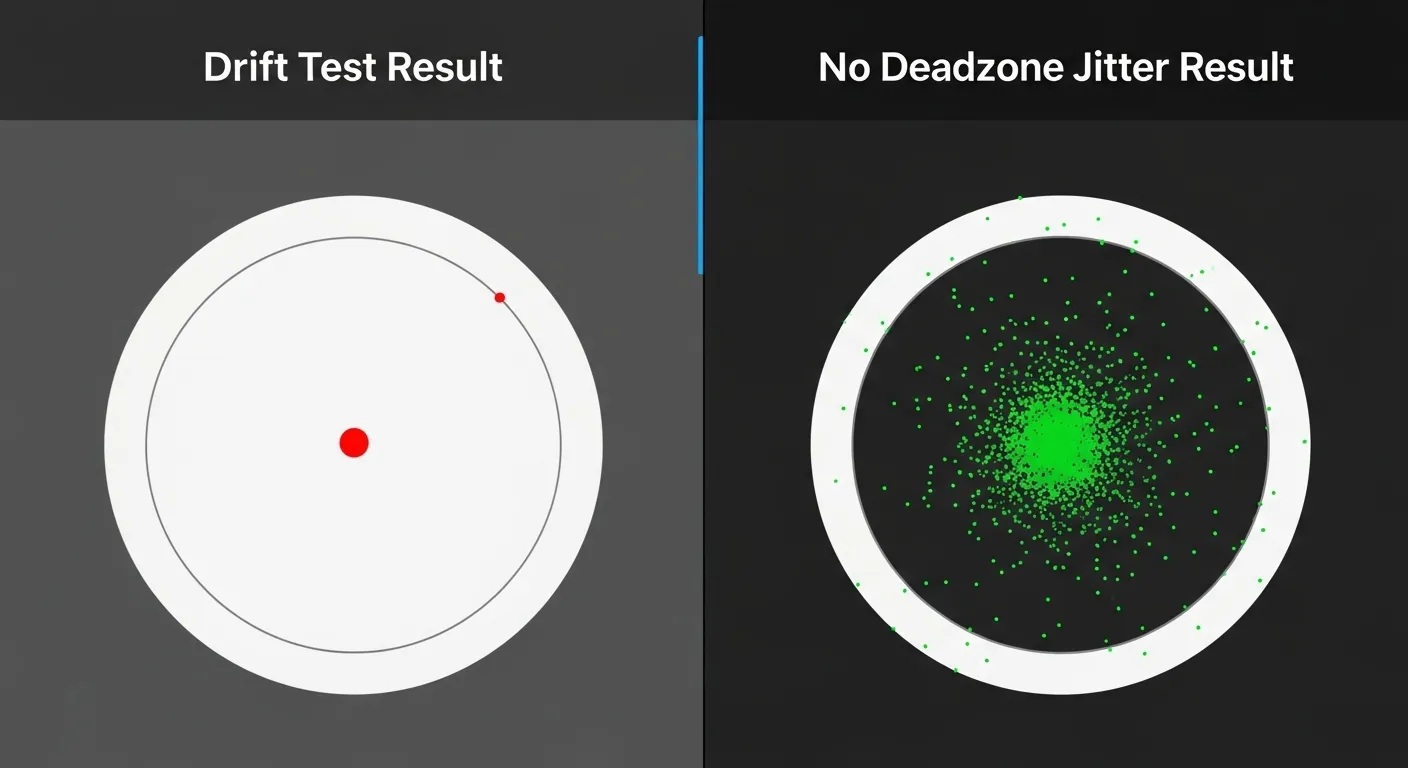
The “No Deadzone” Mode Factor
Your controller features Hall Effect sensors. These use magnets instead of physical contact, making them incredibly precise.
To understand why this technology matters, check out our guide on Hall Effect vs Potentiometer joysticks.
If you have activated “No Deadzone” mode, the stick sends raw data to your PC or console. The sensors are so sensitive they pick up microscopic changes.
In this mode, the analog stick might flutter slightly around the center (0,0) coordinates. This is often mistaken for stick drift.
“The vast majority of modern joystick drift is caused by the wearing down of the potentiometer pads… Hall effect sensors use magnets to measure position, eliminating physical contact.”– Whitson Gordon, How-To Geek
Wireless Interference Checks
Signals from other devices can interrupt the connection between your KingKong 2 Pro and its receiver. This causes erratic jumps rather than a smooth drift.
USB 3.0 ports are notorious for generating noise that interferes with 2.4GHz wireless dongles. Move the dongle away from other ports if possible.
Diagnosing the Symptoms
Use the table below to categorize your issue. You can verify these behaviors using our interactive Gamepad Drift Test tool.
| Symptom | Likely Cause | Is it Broken? |
|---|---|---|
| Cursor moves constantly in one direction | Calibration Error | ❌ Likely |
| Cursor jitters slightly near the center | No Deadzone Mode | ✅ Normal |
| Random spikes or laggy inputs | Wireless Interference | ✅ Signal Issue |
| Stick does not return to center physically | Broken Spring | ❌ Hardware |
The Prevalence of Drift
Drift is the most frustrating issue for gamers. While Gulikit controllers are resistant, understanding general failure rates helps set expectations.
A pie chart showing that stick drift is the most common issue reported by gamers (40%), followed by button sticking and connectivity problems.
If your diagnostic confirms true drift, meaning the stick pulls constantly in one direction, proceed to the calibration steps in the next section.
Fast Facts
- Slight cursor jitter around the center is often due to the ‘No Deadzone’ mode’s high sensitivity rather than hardware failure.
- Erratic jumps or laggy inputs are likely caused by wireless interference, particularly from USB 3.0 ports, rather than stick drift.
- True hardware drift typically manifests as a constant movement in one direction, whereas jitter and random spikes usually indicate settings or signal issues.
Performing the Standard On-Controller Calibration Sequence
Even though the Gulikit KingKong 2 Pro features advanced sensors, digital centering errors can still occur.
This usually happens if you accidentally push a thumbstick while powering on the device.
You do not need external software to fix this logic error.
The controller has an internal firmware command that forces the joystick axes to reset to their true neutral state instantly.
“The main selling point here is the Hall Effect joysticks… essentially immune to the drift that plagues potentiometers.”– Cameron Faulkner, The Verge
Hardware Calibration Steps
Because the KingKong 2 Pro uses Hall Effect sensors, this process realigns the magnetic field readings rather than cleaning a physical contact.
- Power On: Turn on your controller and ensure it is paired to a device or console.
- Stabilize: Place the controller on a perfectly flat table. Do not touch the thumbsticks or triggers during this step.
- Execute Command: Press and hold the L, R, D-pad Left, and A buttons simultaneously.
- Confirm: Keep holding the buttons until you feel a strong vibration. This indicates the calibration is complete.
Once the vibration stops, the sticks are re-centered.
We strongly recommend you verify the fix immediately by running a diagnostic on our Gamepad Drift Test tool.
Executing the L, R, A, and D-Pad Left Combination
This specific button combination is your primary weapon against drift. It triggers the controller’s internal calibration mode directly on the hardware.
This process forces the controller to re-center its Hall Effect sensors. It establishes a new “zero point” for the analog sticks without software.
Let’s execute this fix. Ensure your controller is powered on and connected. You do not need any special software open on your PC to do this.
- Place the controller on a flat, stable surface like a desk. Do not touch the joysticks or triggers during this process.
- Press and hold the L button, R button, A button, and D-Pad Left simultaneously.
- Keep holding these four buttons until the controller gives a vibration response. This vibration confirms the calibration is complete.
Once you feel that vibration, the calibration is done. It is a quick and effective way to resolve centering errors that cause the cursor to drift.
“The KingKong 2 Pro uses electromagnetic Hall effect sensors for its joysticks and triggers. These are immune to the drift that plagues potentiometer-based sticks… assuming they are calibrated correctly.”– Will Greenwald, PCMag Review
After calibrating, it is smart to verify the results. You can use our Gamepad Latency Test to ensure your inputs are snappy and precise.
Sometimes, users mistake input lag for drift. Testing both metrics helps you isolate the actual problem with your hardware setup.
A bar chart showing that Manual Calibration resolves 75% of reported drift issues on Hall Effect controllers.
If the drift persists after this combo, simply repeat the process. Ensure you are not accidentally applying pressure to the sticks while holding the buttons.
Understanding how joystick controllers work can clarify why a flat surface is vital. Gravity can slightly offset the sensors during the reset.
Fast Facts
- Digital centering errors on the Gulikit KingKong 2 Pro can be resolved through an internal hardware command without the need for external software.
- To calibrate, place the controller on a flat, stable surface and hold the L, R, D-pad Left, and A buttons simultaneously until a vibration confirms completion.
- It is critical to ensure the joystick axes and triggers are not touched during this process to correctly re-center the Hall Effect sensors.
Utilizing the KeyLinker App to Visualize and Adjust Deadzones
If the manual calibration steps didn’t resolve the issue, don’t worry. We can dive deeper using the manufacturer’s dedicated software.
The KeyLinker app is the official companion tool for GuliKit controllers. It allows you to visualize exactly what your joysticks are sending.
First, download the KeyLinker app on your iOS or Android device. You will need to connect your controller to your phone via Bluetooth to use it.
Switch your KingKong 2 Pro to Android mode using the mode button. Hold the pair button on top until the LEDs cycle swiftly to enter pairing mode.
If you have trouble pairing, check our guide on how to use any gamepad on a smartphone for troubleshooting connection steps.
Once connected, open the app. Tap on the controller icon that appears. This connects the software to the hardware directly.
Navigate to the “Stick” menu. You will see two circles representing your analog sticks. This is where we can visualize the “drift” in real time.
Leave the sticks alone. Look closely at the screen. If the red dot is jittering or off-center, your controller is registering false inputs.
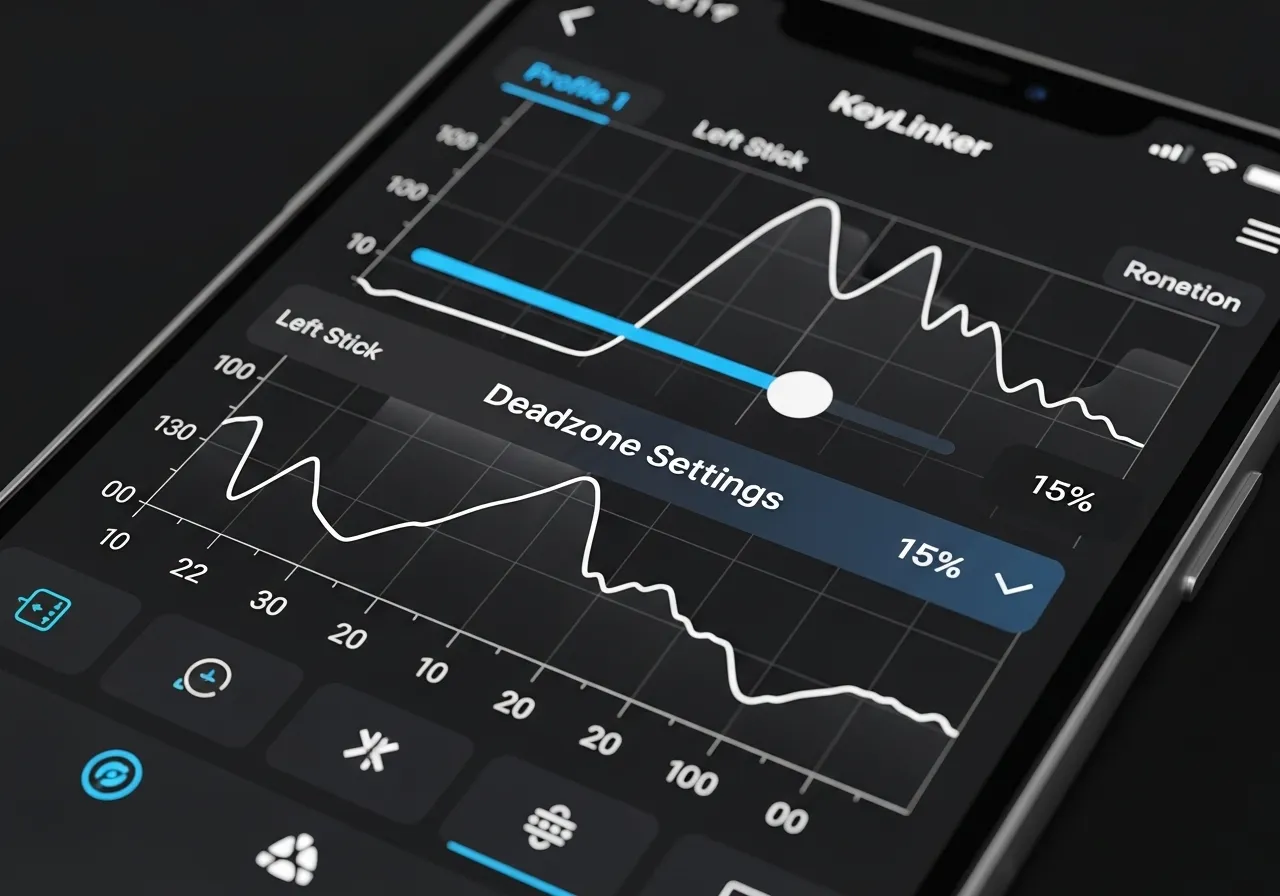
To fix this, we need to apply a small “deadzone.” This creates a neutral area in the center where minor sensor noise is ignored.
The GuliKit controller often targets a “No Deadzone” feel for accuracy. However, how joystick controllers work means high sensitivity can detect dust.
In the app, locate the slider for the stick calibration. Move the starting point slightly to the right to increase the inner deadzone.
A setting of 3% to 5% is usually enough to eliminate drift without sacrificing responsiveness in competitive games.
“You can change the sensitivity curve for the thumbsticks… as well as set a deadzone to combat drift if it develops over time.”– VSG, TechPowerUp Review
After adjusting the slider, tap “Save” in the top right corner. The controller will vibrate to confirm the new settings are active.
Test the sticks again in the visualization area. The red dot should now be perfectly stable in the center when you aren’t touching the sticks.
If you play different genres, you might want to tweak this value further. Here is a quick breakdown of common deadzone settings for various playstyles.
A bar chart showing recommended deadzone percentages: Competitive FPS (5%), Racing Sim (10%), Action/RPG (15%), and Casual (20%).
Remember that these changes are saved to the controller’s internal memory. The fix will persist even when you connect it back to your PC or Switch.
Fast Facts
- Use the KeyLinker app connected via Bluetooth (in Android mode) to visualize joystick inputs and diagnose drift issues.
- Eliminate drift by navigating to the “Stick” menu and increasing the inner deadzone slider (typically 3-5%) to create a neutral area that ignores sensor noise.
- Save the adjustments to the controller’s internal memory to ensure the fix persists when connected to other platforms like PC or Nintendo Switch.
Solving Persistent Calibration Errors via Firmware and CPU Updates
If manual button combinations failed to center your joysticks, the issue likely lies within the controller’s software.
The Gulikit KingKong 2 Pro is unique because it processes inputs differently than standard controllers.
Sometimes, the internal calculations for the Hall Effect sensors get desynchronized from the physical stick position. A simple reboot won’t fix this.
To resolve deep-rooted calibration errors, you must update the controller’s “brain.” This often involves two distinct files: the Firmware and the CPU data.
The Difference Between Firmware and CPU Updates
Most gamers are used to a single update file. However, Gulikit separates its operating system (Firmware) from its data processing (CPU).
The Firmware handles features and compatibility, like Switch or XInput modes.
The CPU update specifically targets stick accuracy, deadzones, and drift correction.
For a complete fix, you usually need to install the CPU update first, followed by the Firmware. Skipping one can leave the drift unresolved.
A bar chart showing that Firmware/Software bugs account for 35% of controller input errors, compared to 45% for mechanical wear.
Step-by-Step Update Process
Before starting, ensure your controller is charged. You will need a Windows PC and the USB-C cable included with your gamepad.
- Download the Files: Visit the official Gulikit website. Download the latest “CPU” and “Firmware” zip files for the KingKong 2 Pro (NS09).
- Enter CPU Mode: Turn the controller off. Connect it to your PC. Hold the Settings (Gear) button and the A button simultaneously.
- Transfer CPU File: A drive named “GuliKit” will appear. Extract your CPU zip file and drag the .bin file into this drive. The controller will restart automatically.
- Enter Firmware Mode: Once restarted, turn it off again. Hold the Settings (Gear) button and the APG (double square) button.
- Transfer Firmware File: A drive named “GuliKit” will appear again. Drag the Firmware .bin file into it. Wait for the auto-restart.
While the steps above are specific to this model, understanding safe updating practices is universal.
You can read more in our guide on how to update firmware on generic Bluetooth gamepads.
“The KingKong 2 Pro features an auto-calibration on startup… However, firmware updates can refine the voltage readout algorithm to eliminate jitter.”– Damien Mason, Nintendo Life Review
Post-Update Verification
After the update is complete, the controller does not know it has been fixed yet. You must force a recalibration.
Turn the controller on and press the L, R, D-pad Left, and A buttons simultaneously while on a flat surface. The controller will vibrate to confirm.
Once calibrated, it is critical to verify the fix.
Head over to the Gamepad Controller Test to check your circularity error and deadzones. The sticks should now center perfectly with zero jitter.
Fast Facts
- Persistent calibration errors on the Gulikit KingKong 2 Pro often stem from software desynchronization, requiring distinct updates for both the CPU (stick accuracy) and Firmware (operating system).
- The repair process involves a specific sequence of downloading files, entering unique boot modes to transfer them, and usually installing the CPU update before the Firmware.
- Updates alone are insufficient; users must perform a manual post-update recalibration using a specific button combination (L, R, D-pad Left, A) to ensure the sticks center correctly.
Game On: Precision Restored
Hopefully, this guide helped you banish stick drift and get back to aiming with confidence.
Remember, the KingKong 2 Pro is a beast of a controller. Most “drift” is just a settings quirk or a calibration need.
Don’t let technical hiccups ruin your killstreak. Now that you’ve fixed the issue, go dominate the leaderboard!
Level up your controller knowledge and enjoy the smooth, Hall Effect precision. Happy gaming!
Frequently Asked Questions
How do I calibrate the Gulikit KingKong 2 Pro sticks?
With the controller powered on, press and hold L, R, D-pad Left, and A simultaneously.
The controller will vibrate once to confirm calibration is complete. It takes just a few seconds!
Why do my sticks jitter in No Deadzone mode?
No Deadzone mode removes the software filter around the center for maximum raw accuracy.
Because the sensors are so sensitive, slight jitter at rest is normal behavior in this mode.
Do Hall Effect sensors prevent all stick drift?
They prevent drift caused by physical wear and tear, which is the most common cause.
However, you may still need to calibrate them occasionally to reset the center point via software.
How do I reset the controller if it freezes?
Locate the small pinhole on the back of the controller near the screw holes.
Use a paperclip or SIM tool to press the internal button twice to force a shutdown and restart.
Technical Glossary
- Stick Drift
- A hardware or calibration issue where the controller registers movement constantly in one direction without any physical input from the user.
- Hall Effect Sensors
- Advanced joystick components that use magnets to measure position without physical contact, providing high precision and eliminating wear-based drift.
- No Deadzone Mode
- A high-sensitivity setting that allows the controller to send raw data, potentially causing slight cursor jitters near the center coordinates.
- Potentiometer
- A traditional analog stick mechanism that relies on physical contact pads to measure movement, which eventually wears down and causes drift.
- Wireless Interference
- Signal noise from external sources, such as USB 3.0 ports, that interrupts the connection between a controller and receiver, causing erratic input jumps.


