Table of Contents
Controller not charging? A loose port is a common enemy, but you can defeat it!
This DIY guide will walk you through the simple steps to tighten that connection and ensure a solid charge every time.
Forget the frustration and level up your controller knowledge.
Let’s get this fixed and get you back to playing, fast!
TL;DR
- Diagnose a loose charging port by checking for intermittent charging, a wobbly connection, or no charging light.
- Before blaming the controller, always test with a different, known-working USB cable and power source to rule them out.
- A common and easy fix is to carefully clean the charging port with compressed air and a non-metallic tool, like a toothpick, to remove packed-in debris.
- If the port is severely damaged, consider alternative solutions like a charging dock before paying for expensive repairs or a brand new controller.
Diagnosing Your Loose Controller Charging Port
Before you break out the toolkit, let’s properly diagnose the issue. A loose charging port has specific symptoms that separate it from a dead battery or a faulty cable. Let’s get you back in the game by pinpointing the problem first.
Common Symptoms of a Faulty Port
If you’re experiencing any of the following, the charging port is the likely culprit.
A quick check can save you a lot of time and frustration. Look for these tell-tale signs of a hardware issue with your gamepad’s port.
- Intermittent Charging: The controller only charges when you hold the cable at a specific, awkward angle.
- Wobbly Connection: The USB cable feels loose and unstable even when fully inserted into the port.
- No Charging Light: When you plug the controller in, the charging indicator light doesn’t turn on at all.
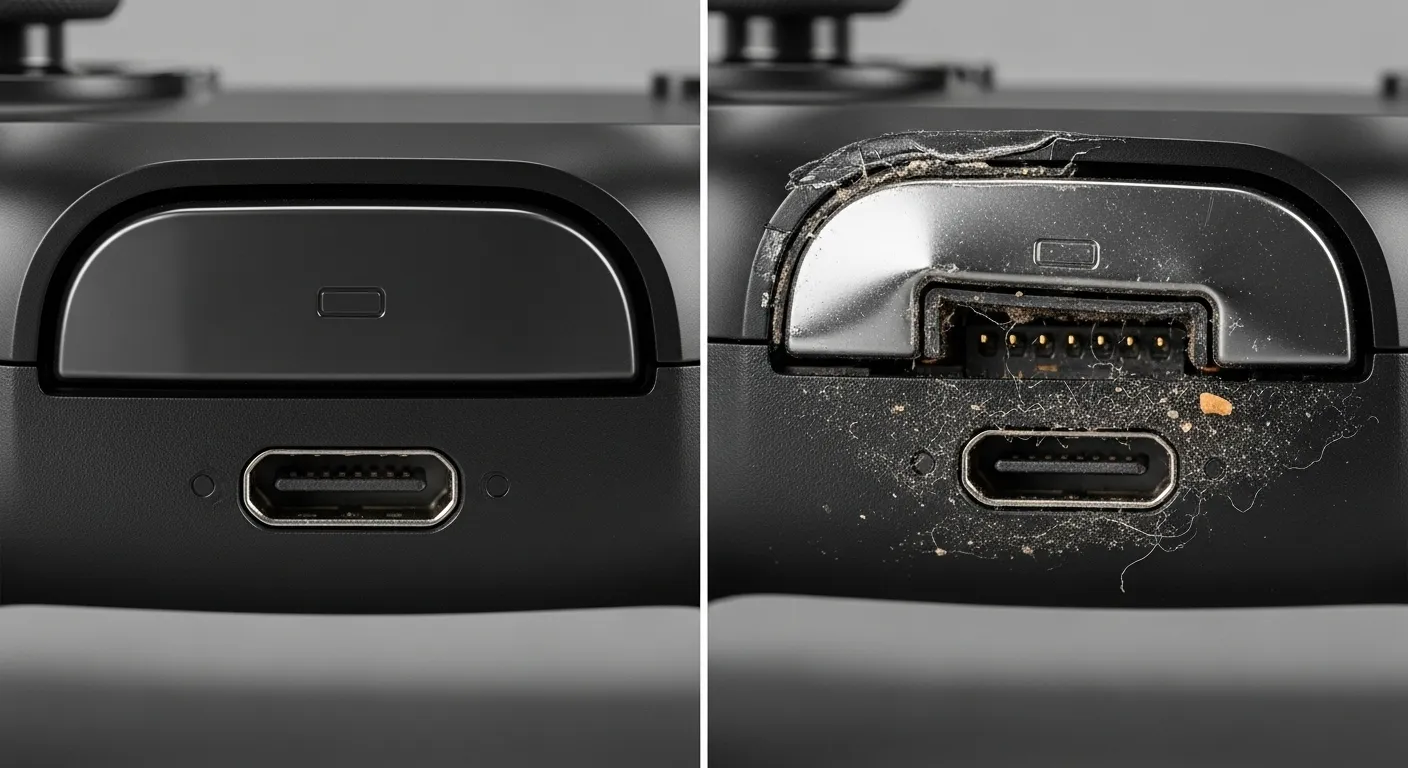
- Visible Debris or Damage: A quick look inside the port reveals lint, dust, or bent connector pins.
Rule Out the Easy Stuff First
Always check your charging cable and power source before assuming the controller’s port is broken. Try a different USB cable that you know works with another device. Also, try plugging the controller into a different USB port or wall adapter.
If the controller still doesn’t charge, you’ve isolated the problem to the gamepad itself.
For a completely dead controller, other issues could be at play. If your DualShock 4 won’t turn on, it could be the battery or an internal fault.
A bar chart comparing controller repair costs. The average cost for DIY parts is $10, a professional repair service is $45, and a new controller is $70.
A visual inspection is your most powerful diagnostic tool.
Use a flashlight to peer inside the charging port. Look for any foreign objects, like pocket lint or dirt, that could be obstructing the connection.
Also check for bent or broken pins.
“The vast majority of the time when a device isn’t charging, it’s not some complex motherboard issue, it’s just lint in the charging port.”– Louis Rossmann,
CBC News
First Steps: Non-Invasive Fixes and Cleaning
Before you think about complex repairs or replacements, let’s cover the basics.
A loose charging port is often caused by simple issues you can fix yourself in minutes. Let’s get you back in the game without reaching for a screwdriver just yet.
Check Your Cable and Power Source
The problem might not be your controller at all. The USB cable is the most common point of failure.
Grab a different cable that you know works and try charging with it. Also, try plugging it into a different USB port or power adapter to rule that out.
Inspect and Clean the Charging Port
Over time, dust, lint, and other debris get packed into the charging port. This buildup can prevent the cable from seating correctly, making the connection feel loose.
A thorough cleaning can often solve the problem instantly.
Follow these steps carefully to clean your controller’s port without causing damage. Remember to be gentle, as the internal pins are delicate.
- Power Down: Make sure your controller is completely turned off.
- Inspect Closely: Use a flashlight to look inside the port for visible debris.
- Use Compressed Air: Give the port a few short bursts of compressed air to dislodge any loose particles.
- Gently Scrape: If debris is compacted, carefully use a non-metallic tool like a wooden toothpick or a plastic dental pick to gently scrape it out. Avoid metal objects like paper clips, which can cause short circuits.
- Final Blast: Use compressed air one last time to clear out anything you loosened.
“Your charging port is a magnet for all the gunk and grime that find their way into your pocket or bag… Over time, this buildup can get in the way of a solid connection.”– Asurion Experts, Asurion
After cleaning, try plugging the charging cable back in.
You should feel a more secure, clicking connection.
A faulty port can sometimes make it seem as though your DualShock 4’s battery won’t hold a charge, when the real issue is just a poor connection.
Fast Facts
- Common symptoms of a faulty charging port include intermittent charging, a wobbly connection, no charging light, or visible debris/damage inside the port.
- Before assuming the port is broken, always rule out the charging cable and power source by trying a different, known-working cable and a different USB port or adapter.
- Many loose charging port issues can be resolved with non-invasive fixes, primarily by carefully inspecting and cleaning out debris like lint or dust from the port using compressed air or a non-metallic tool.
Beyond Repair: Effective Alternative Charging Solutions
Sometimes, a charging port is simply beyond a simple fix. If the internal pins are bent or the port is completely detached, it’s time to level up your charging strategy.
This doesn’t mean your favorite gamepad is destined for the landfill. Let’s get you back in the game with some powerful alternatives.
Official and Third-Party Charging Docks
Many modern controllers, including the PS5 DualSense and Xbox Series X|S gamepads, feature external charging contacts. These are small metal points, often near the bottom of the controller, designed specifically for dock charging.
A charging dock or stand is a fantastic workaround. It bypasses the faulty USB port entirely, using these contacts to power up your controller.
They also provide a clean and organized way to store and display your gear, ensuring it’s always ready for action.
Rechargeable and Swappable Battery Packs
For controllers that use disposable batteries, like the standard Xbox controller, a “play and charge” kit with a rechargeable battery pack is a game-changer.
These kits provide a battery that can be charged outside the controller.
This method gives you ultimate freedom.
When the power gets low, you simply swap the depleted battery for a fresh one.
This means zero downtime and no cables tethering you to your console during a critical match.
“It’s beyond frustrating that these expensive, resource-intensive, and mechanically complex devices are doomed by a cheap, high-wear component.”– Arthur Shi,
iFixit
Comparing Your Charging Options
When the original port fails, you have several paths forward.
Each alternative has its own unique benefits depending on your controller type and gaming habits.
Here’s a quick breakdown to help you decide.
| Solution | Best For | Pros | Cons |
|---|---|---|---|
| Charging Dock | PS5, Xbox Series X|S | ✅ Convenient, reduces port wear, organized storage | ❌ Requires controller with charging contacts |
| Swappable Battery Pack | Xbox Controllers | ✅ Continuous play, no downtime, cost-effective | ❌ Requires managing multiple batteries |
| Professional Repair | High-end or rare controllers | ✅ Restores original function, high success rate | ❌ Can be costly and time-consuming |
Choosing an alternative charging method can feel like an upgrade.
Once you have a reliable way to power up, it is a good idea to ensure everything else is working perfectly. You can quickly check your gamepad’s rumble feature with our Controller Vibration Test.
Fast Facts
- Broken charging ports don’t mean the end for game controllers, as viable alternative charging solutions exist.
- For controllers with external charging contacts (e.g., PS5 DualSense, Xbox Series X|S), charging docks bypass faulty USB ports, offering convenience and organized storage.
- For controllers using disposable batteries (e.g., standard Xbox), rechargeable and swappable battery packs eliminate downtime and offer continuous play.
Internal Repair Risks: When (and How) to Disassemble
If cleaning and cable testing haven’t worked, the problem may be internal.
Opening your controller is a last resort. It will likely void your warranty and carries the risk of causing more damage if done incorrectly.
This is the final boss of controller repair. Only proceed if you’re out of other options and feel confident in your abilities.
Let’s level up your knowledge on when and how to tackle this challenge.
When Is It Time to Open Your Controller?
Before you reach for your tools, consider if disassembly is truly necessary. This path is usually best if:
- All external cleaning and testing methods have failed to solve the issue.
- Your controller’s warranty period has already expired.
- You are comfortable working with delicate electronics and small parts.
- You can see the port is physically broken or detached inside the shell.
Essential Tools for Controller Surgery
Having the right gear is crucial for a successful repair. A basic toolkit will get you far.
Make sure you have these items on hand before you start the operation.
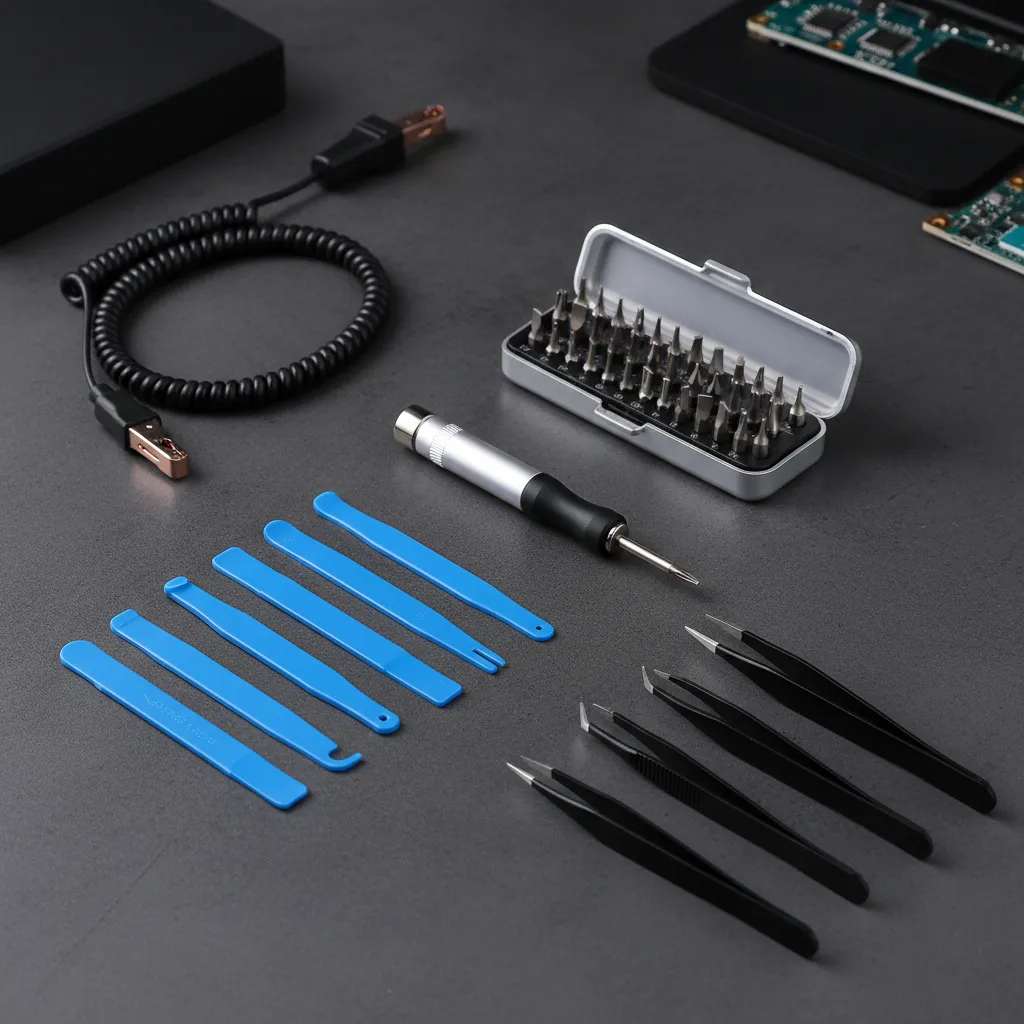
- Precision Screwdriver Set: Most controllers use small Philips or Torx screws.
- Plastic Prying Tools (Spudgers): These are essential for separating the shell without scratching or breaking the plastic.
- Tweezers: Perfect for disconnecting and reconnecting tiny ribbon cables and wires.
- Soldering Iron & Solder: Only needed if you plan to replace the port entirely. This is an advanced step.
The Disassembly Process: A High-Level Guide
Every gamepad is unique, so always look up a specific teardown guide for your model on a site like iFixit or YouTube.
However, the general steps are often similar.
First, remove all external screws. Some may be hidden under stickers or inside the battery compartment.
Next, use a plastic prying tool to carefully separate the two halves of the controller shell, working your way around the seam.
Once it’s open, be extremely careful.
You will likely find fragile ribbon cables connecting the circuit boards. These control everything from triggers to vibration.
Disconnect them gently before separating the shell completely.
“The problem is that you have to use a microscope and specialized tools. It’s not something that’s going to get fixed at a mall kiosk.”– Jessa Jones, Wired
With the controller open, inspect the charging port’s connection to the main board.
If the solder points look cracked, you may be able to reflow them with a soldering iron. This can re-establish the connection.
If the entire port is broken, it must be replaced.
This requires desoldering the old port and soldering a new one.
This is a delicate process that can easily damage the board, much like attempting an advanced fix for stick drift.
If you are not experienced, consider seeking professional help.
Avoiding Future Damage and Repair vs. Replacement Decisions
Prevention is the best way to keep your charging port in top shape.
A little care goes a long way in avoiding future headaches and potential repairs.
Let’s level up your controller care routine.
Most port damage comes from physical stress.
Angling the cable, yanking it out, or charging while playing intensely can bend the internal pins over time.
Treating the port gently is crucial for longevity.
Best Practices for Port Protection
To keep your connection solid, adopt these simple habits:
- Plug and Unplug Straight: Always insert and remove the charging cable in a straight, direct line. Avoid wiggling or angling it.
- Avoid Strain During Play: Charging while playing is convenient, but the cable’s weight and movement can put heavy stress on the port. If you must, ensure there is plenty of slack.
- Use Quality Cables: A well-made USB cable with a properly sized connector is less likely to cause wear and tear than a cheap, ill-fitting one.
- Store Smartly: Don’t store your controller with the cable still plugged in, especially if it’s crammed into a bag or drawer where it can bend.
Making the Call: Repair or Replace?
If your port is already loose, you face a tough choice.
First, always check your warranty. If the controller is still covered, a free manufacturer repair or replacement is your best option.
If the warranty has expired, weigh the cost of a new controller against a professional repair. For standard controllers, a repair might cost more than half the price of a new one, making replacement a better deal.
“This is a big deal… It’s a message from the very top that the Repair Monopolies that force us to go to the manufacturer for repair are on their way out.”– Nathan Proctor,
U.S. PIRG | TechCrunch
Consider the controller’s overall health. If you are also dealing with other issues like stubborn buttons or analog stick problems, it might be time to retire it.
For example, fixing a port on a joypad that also has severe drift might not be worth the investment.
Before you decide, give your gamepad one final check-up.
Use a comprehensive Gamepad Controller Test to check every button, stick, and trigger. This ensures you are not fixing one problem only to discover another one later.
Fast Facts
- Opening a controller for internal repair is a high-risk, last-resort option, only advisable after external fixes fail, the warranty has expired, and if you are confident with delicate electronics and possess the necessary specialized tools.
- The disassembly process requires precision tools (e.g., screwdrivers, plastic prying tools, tweezers), adherence to model-specific guides, and extreme caution due to fragile internal components like ribbon cables, with advanced repairs like port soldering carrying a high risk of further damage.
- Preventative care, such as plugging and unplugging cables straight, avoiding strain during play, and using quality cables, is crucial to extend port longevity and minimize the need for internal repairs.
Power Up: You’ve Leveled Up Your Controller Knowledge
Fixing a loose charging port is totally doable! You now know how to diagnose the problem and rule out the simple stuff like a bad cable first.
Remember, a careful cleaning with the right tools often solves the issue without any complex repairs. It’s the easiest and safest first step!
Whether you choose a DIY fix or call a pro, you’re equipped to make the best call. Let’s get you back in the game, fully charged and ready to play!
Frequently Asked Questions
Can I use a metal object to clean the charging port?
Absolutely not! Using metal can short-circuit the electronics or permanently damage the delicate connector pins inside the port. Always use safe tools.
What if cleaning the port doesn’t fix the looseness?
If the port is still wobbly after a thorough cleaning, its internal anchors are likely broken. This often requires a more advanced repair, like soldering.
Is it cheaper to repair the port or buy a new controller?
A DIY repair is the cheapest option by far. Professional service costs about half the price of a new controller, so it depends on your budget.
How can I prevent my charging port from getting loose again?
Be gentle when plugging and unplugging the cable. Try not to play while charging, as this puts a lot of physical stress on the port connection.
Technical Glossary
- Charging Port
- The physical connector on the controller where the USB cable is inserted to recharge the device’s battery.
- USB Cable
- The cord used to connect the controller to a power source, such as a wall adapter or console, to charge it.
- Connector Pins
- The small metal contacts inside the charging port that make the electrical connection with the charging cable.
- Charging Indicator Light
- A light on the controller that signals the status of the charging process, such as whether it is currently charging or fully charged.
- Power Source
- The origin of the electrical power for charging, which could be a wall adapter, a console’s USB port, or a computer.


