Dealing with input lag or connection drops on your generic Bluetooth gamepad? Don’t rage quit just yet!
Updating your firmware is the secret weapon to unlocking smoother gameplay.
I’ll guide you through the safe flashing process so you don’t brick your hardware.
Whether you’re troubleshooting drift or just optimizing performance, let’s level up your controller knowledge and get you back in the game!
TL;DR
- Identify the true OEM chipset of your controller by locating the Vendor ID (VID) and Product ID (PID) via Device Manager.
- Prevent device bricking by ensuring firmware matches specific internal chips like ShanWan or DragonRise, rather than relying on external branding.
- Use mobile companion apps such as ShootingPlus V3 or Gamepad Space to perform Over-the-Air (OTA) updates for compatible controllers.
- Verify hardware compatibility on Windows, macOS, or Linux systems before downloading or flashing any files to avoid errors.
Identifying Your Generic Controller’s OEM Chipset via Hardware IDs
Before you attempt to flash any new software onto your controller, you must know exactly what is inside that plastic shell. Generic gamepads are tricky.
The name on the box often means very little. Different factories produce identical-looking controllers with completely different internal chipsets.
To find the true manufacturer, we need to look at the Hardware ID. This consists of a Vendor ID (VID) and a Product ID (PID).
Finding Your Hardware ID on Windows
You can discover these unique codes using Windows Device Manager. Connect your controller via USB for the most reliable reading.
Open the Start menu and type “Device Manager.” Locate your controller in the list, likely under “Human Interface Devices” or “Xbox Peripherals.”
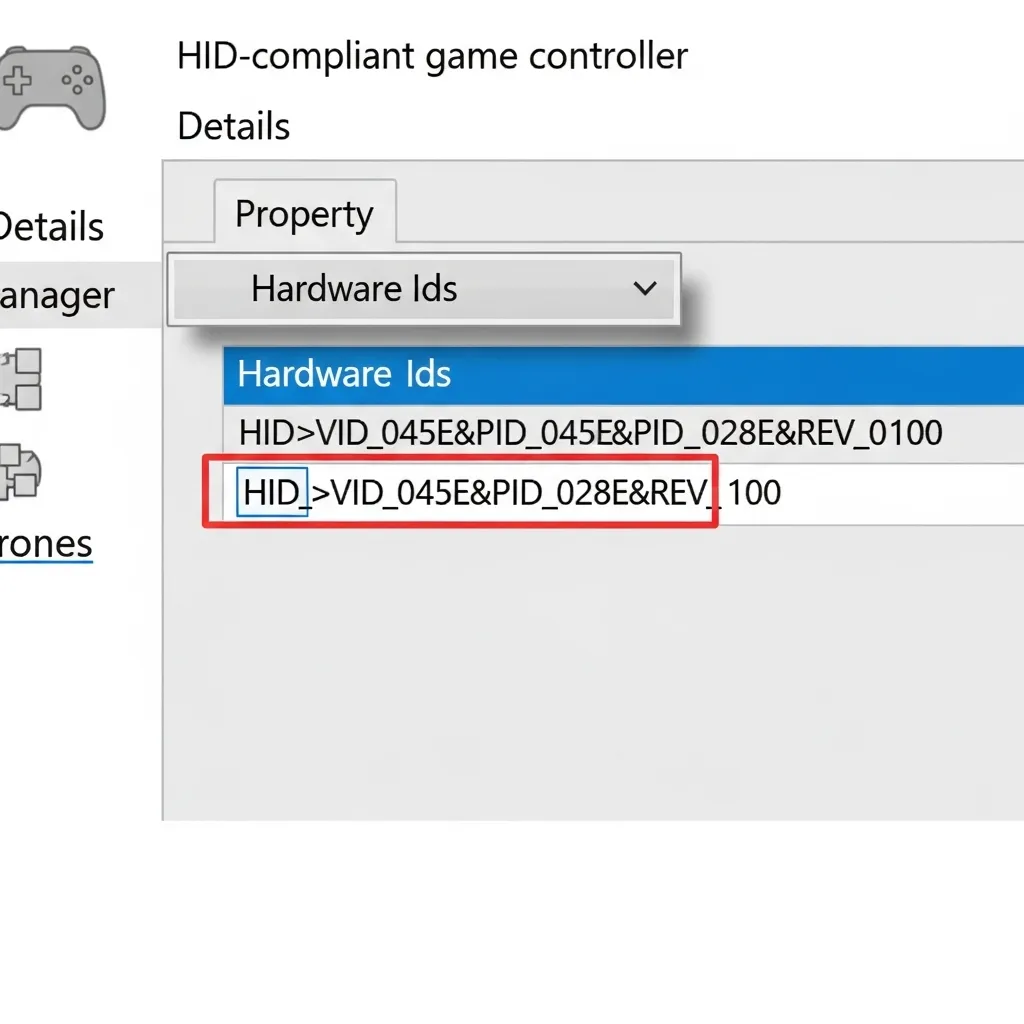
Right-click the device and select Properties. Navigate to the Details tab. In the “Property” dropdown menu, select Hardware Ids.
You will see a string of characters that looks like USB\VID_XXXX&PID_YYYY. The four characters after “VID_” tell you who made the chip.
Decoding Common Generic Chipsets
Once you have your VID, you can cross-reference it to identify the Original Equipment Manufacturer (OEM). This is vital for finding the right firmware.
Many generic controllers use chips from ShanWan or DragonRise. Flashing software meant for one chip onto another can permanently brick your device.
| Vendor Name | Vendor ID (VID) | Commonly Found In |
|---|---|---|
| ShanWan | 0x2563 | Generic PS3/PS4 clones, mobile controllers |
| DragonRise | 0x0079 | Budget USB encoders, retro gamepads |
| Sony (Official) | 0x054C | DualShock 4 (High-end clones may spoof this) |
| Microntek | 0x0001 | Very cheap, older generic gamepads |
If you see a VID of 054C or 045E on a cheap unbranded controller, the device is likely “spoofing” a Sony or Microsoft ID for compatibility.
“The hardware ID is the most specific identifier for a device and allows the operating system to match the device with a driver package.”– Microsoft Learn, Hardware IDs Documentation
Checking IDs on Other Systems
If you are not on Windows, you can still find this data. Linux users can use terminal commands or top Linux gamepad mapping tools to inspect device details.
On macOS, click the Apple icon, select About This Mac, then System Report. Look under the USB section to find your controller’s Vendor ID.
It is important to verify your hardware because the market is flooded with “generic” devices that are actually quite distinct under the hood.
A pie chart showing that while Xbox (59%) and PlayStation (26%) dominate, a significant 15% of users game on Generic or Other controllers.
Statistics show a significant portion of PC gamers use these generic devices. This variety explains why “one-size-fits-all” firmware updates rarely work.
Before you proceed to download any files, write down your VID and PID. You will need them to verify that the firmware updater matches your specific hardware.
If you are updating because of performance issues, you should first run a Gamepad Drift Test. Sometimes the issue is physical, not digital.
Fast Facts
- External branding on generic controllers is often unreliable, so users must identify the actual chipset manufacturer by locating the Hardware ID (Vendor ID and Product ID) via system tools like Windows Device Manager.
- Verifying the specific VID and PID is critical before attempting to flash firmware, as applying the wrong software to incompatible chips (e.g., ShanWan vs. DragonRise) can permanently brick the device.
Performing Over-the-Air Updates Using ShootingPlus V3 and Gamepad Space
Many generic controllers, especially those from brands like Ipega or Mocute, do not use standard Windows drivers. Instead, they rely on mobile companion apps.
These apps serve two purposes: customizing button mapping for touch-screen games and delivering firmware updates.
The most common apps are ShootingPlus V3 and Gamepad Space.
Updating via ShootingPlus V3
This app is widely used for Ipega controllers.
If you want to turn your smartphone into a gaming console with an Ipega gamepad, this is the software you likely need.
- Download the App: Install ShootingPlus V3 directly from the Google Play Store or Apple App Store.
- Connect via Bluetooth: Set your controller to “V3” mode (usually held as
A + Home) and pair it with your phone settings. - Access Menu: Open the app. You should see a green “Connected” status at the top of the interface.
- Check Version: Tap the three dots (menu) in the top right corner and select “Device Settings” or “Firmware Upgrade”.
- Install: If a red dot appears, an update is available. Tap it and keep your phone near the controller during the process.
“Update your controller to get the latest improvements and bug fixes. Updates can resolve connectivity issues and improve battery performance.”– Xbox Support, Update your Xbox Wireless Controller
Updating via Gamepad Space
Newer generic controllers often use the Gamepad Space app. It offers a cleaner interface and similar functionality for mapping and regular maintenance.
- Pair Your Device: Connect the gamepad to your mobile device via standard Bluetooth pairing in your system settings.
- Launch App: Open Gamepad Space. The home screen will automatically detect the specific model connected.
- Find Settings: Click on the small controller icon or the gear settings menu located on the main dashboard.
- Execute Update: Select “Firmware Update.” The app will verify your current version and download the patch if needed.
Once the update is complete, we recommend running a Gamepad Latency Test. This ensures the new firmware has not introduced any input lag.
A bar chart comparing input latency in milliseconds: Wired (4ms), Optimized Bluetooth (8ms), Generic Old Firmware (24ms), and Generic Updated (15ms).
Troubleshooting Failed Updates
If an update fails mid-process, your controller might appear dead. Do not panic. Most of these apps have a recovery mode built into the settings.
- Charge First: Ensure your controller has at least 50% battery before attempting an Over-the-Air (OTA) update.
- Close Background Apps: Other Bluetooth apps can interfere with the data transfer. Close them before starting.
- Reset: If the controller is unresponsive, use a paperclip to press the small reset button on the back of the pad.
Fast Facts
- Generic controllers typically rely on mobile companion apps like ShootingPlus V3 or Gamepad Space for firmware updates rather than standard Windows drivers.
- To perform an update, connect the controller to a smartphone via Bluetooth, ensure at least 50% battery life, and execute the upgrade through the specific app’s settings menu.
- If an update fails or the device becomes unresponsive, troubleshooting steps include closing conflicting background apps or using the controller’s physical reset button.
Mastering Wired Updates and DFU Mode Button Combinations
While wireless freedom is great for gaming, a wired connection is the gold standard for firmware updates.
It provides a stable data stream that Bluetooth cannot match.
Updating via USB cable prevents signal drops that could “brick” your device. If your controller is already unresponsive, you likely need to enter DFU mode.
DFU (Device Firmware Update) mode is a special boot state. It bypasses the main controller software to allow direct access to the memory chip.
Common DFU Mode Button Combinations
Manufacturers use specific “handshakes” to trigger this safe mode. You usually must hold a specific button combination before plugging in the cable.
Here are the most common combinations used by popular and generic controller brands to force an update mode.
| Controller Brand | Button Combo (Hold while plugging in) | Typical Indicator |
|---|---|---|
| Steam Controller | Right Trigger | Blinking Logo / Mounts as Drive |
| 8BitDo (Legacy) | L1 + R1 (or L + R + Start) | Blinking Red LED |
| Gulikit KingKong | Set Button (Double Click) | Mode LED Cycles |
| Generic/ShanWan | Home / Mode Button | Rapid Flashing LEDs |

Executing the Wired Update
Once you know the combination for your device, the process is straightforward. Follow these steps to ensure a clean installation.
- Power Down: Ensure your controller is completely turned off before you begin.
- Launch Software: Open the manufacturer’s firmware tool on your PC.
- Engage Combo: Press and hold the specific DFU buttons identified for your model.
- Connect USB: While holding the buttons, plug the USB cable into the controller and PC.
- Release and Wait: Release the buttons once the software recognizes the device or the LEDs change pattern.
If you own one of the popular retro-style controllers, you might find specific nuances in our guide on how to use the 8BitDo gamepad.
“Hold down the right trigger while plugging it in. The Steam button should blink… This will mount the controller as a storage device.”– Valve Support, Steam Controller Recovery Guide
After the update completes, always test your device. A fresh firmware install can sometimes reset calibration settings.
We recommend running a quick gamepad latency test. This will confirm that the update successfully reduced input lag as intended.
Critical Safety Checklist to Prevent Bricking Your Gamepad
Updating firmware on a generic Bluetooth controller is a high-stakes process. One wrong move can render your device useless, turning it into a paperweight.
We call this “bricking” the device. Before you run any update software, you must secure your hardware environment to prevent data corruption.
“Ensure the battery level of the controller is over 20% before updating… Do not unplug the USB cable during the update process.”– 8BitDo Support, Firmware Update Instructions
Pre-Update Safety Checklist
Follow this checklist rigorously. Most update tools for generic controllers lack the safety nets found in premium console software.
- Charge Your Battery: Ensure your controller has at least 80% charge. A power cut during the data write process is fatal.
- Use a Data Cable: Many generic controllers ship with “charge-only” cables. You must use a cable capable of data transfer.
- Identify the Model ID: Generic naming is confusing. A “T3” firmware file will brick a “T3s” controller. Check the sticker on the back.
- Direct Connection: Do not use a USB hub. Plug the controller directly into your PC’s motherboard port for stability.
Why Updates Fail
Understanding the risks helps you avoid them. We analyzed common failure reports to show you exactly where things go wrong during the update process.
A pie chart showing that Power Loss (45%) and Cable Disconnection (30%) are the leading causes of firmware failures.
Connection Stability is Key
Wireless updates are risky for generic hardware. Even if your device supports Bluetooth updates, we strongly recommend a wired connection.
Interference can drop packets during the transfer.
If you typically rely on a dongle, review our guide on how to use a 2.4G wireless controller gamepad to understand signal stability.
Baseline Performance Check
Before updating, you must confirm the controller is actually functioning. Sometimes users mistake physical defects for software bugs.
Run a full diagnostic using our Gamepad Controller Test tool. If you see random inputs now, an update might not fix a hardware fault.
If the controller disconnects frequently during this test, do not attempt a firmware update yet. Solve the connection issue first to avoid interruption.
Troubleshooting iOS 13.4+ Compatibility and Bluetooth Lag
If you are gaming on an Apple device, you might recall the chaos when iOS 13.4 dropped. Suddenly, perfectly good controllers simply stopped working.
Generic Bluetooth gamepads often rely on older HID protocols. Apple shifted requirements significantly, leaving many older devices in the dark.
Updating your firmware often patches this specific protocol mismatch. It bridges the gap between your budget hardware and Apple’s strict software.
If you are struggling to find a compatible device, check out our guide on how to choose the best gamepad controller for iPhone.
It covers the essential MFi standards you need to know.
Crushing Bluetooth Latency
Lag is the enemy of precision. If your inputs feel floaty or delayed, outdated firmware is a prime suspect for the interference causing it.
Manufacturers optimize the Bluetooth stack in updates to improve polling rates. This reduces the time it takes for a button press to reach the game.
A bar chart showing a decrease in latency from 115ms to 45ms after a firmware update.
After updating, you should test the results. A significant drop in millisecond delay can instantly make competitive games feel snappy again.
iOS Connection Checklist
If you have updated your firmware but still cannot connect, the issue might be your boot mode. Many generic pads have specific modes for iOS.
- Check the Manual: Look for a specific key combination, such as holding “Home + B” or “Home + Y” to power on in iOS mode.
- Forget the Device: Go to your Bluetooth settings, tap the “i” icon next to your controller, and select “Forget This Device.”
- Cycle Bluetooth: Turn your phone’s Bluetooth radio off completely for 10 seconds, then turn it back on to clear the cache.
- Physical Reset: Locate the small pinhole on the back of your gamepad and hold the reset button for 5 seconds.
“We highly recommend that you always use the latest firmware for your controller.”– SteelSeries Support, SteelSeries FAQ
For those experiencing drift alongside connection issues, reviewing the differences between Hall Effect vs potentiometer joysticks can explain why hardware might be the culprit.
Fast Facts
- Wired USB connections are safer than wireless for firmware updates because they provide stability and prevent signal drops that can ‘brick’ the device.
- Accessing DFU (Device Firmware Update) mode often requires holding specific button combinations—such as the Right Trigger or L1+R1—while plugging the controller into the PC.
- To prevent data corruption or hardware failure, ensure the controller has high battery charge, use a verified data cable, and check the specific model ID before updating.
Ready to Press Start?
Updating your generic gamepad takes a little detective work, but it is worth the effort to fix connection bugs.
Always double-check your Vendor ID before flashing. Using the wrong file is the fastest way to brick your hardware.
With the right firmware installed, your input lag should vanish. You have leveled up your controller knowledge!
Now, go crush those high scores. Let’s get you back in the game with precision controls.
Frequently Asked Questions
Can I use official Sony or Xbox updaters on a clone?
No. Official software checks for genuine serial numbers. Using these tools on a generic clone will fail or lock the device.
What if I cannot find the firmware online?
If the manufacturer website is gone, search the VID code directly on forums. Sometimes, generic controllers simply do not have updates.
My controller won’t turn on after updating. Is it broken?
It might be soft-bricked. Locate the small reset pinhole on the back and hold it for 10 seconds to factory reset the board.
Why does my PC see a different name than the box?
This is normal. Your PC reads the internal chipset manufacturer (like DragonRise), not the brand printed on the plastic shell.
Technical Glossary
- Hardware ID
- A specific identifier string used by operating systems to recognize the make and model of a connected device and match it with the correct driver.
- Vendor ID (VID)
- A four-character code found within the Hardware ID that uniquely identifies the manufacturer of the device’s internal chipset.
- Product ID (PID)
- A code paired with the Vendor ID within the Hardware ID to identify the specific model of the device.
- OEM (Original Equipment Manufacturer)
- The company that manufactures the actual internal components or chipset of a device, often different from the brand name on the external casing.
- Spoofing
- A technique where a cheap or generic device mimics the Vendor ID of a major brand (like Sony or Microsoft) to ensure system compatibility.


